 Fixated on Home
Introduction to Budget Attic Transformations
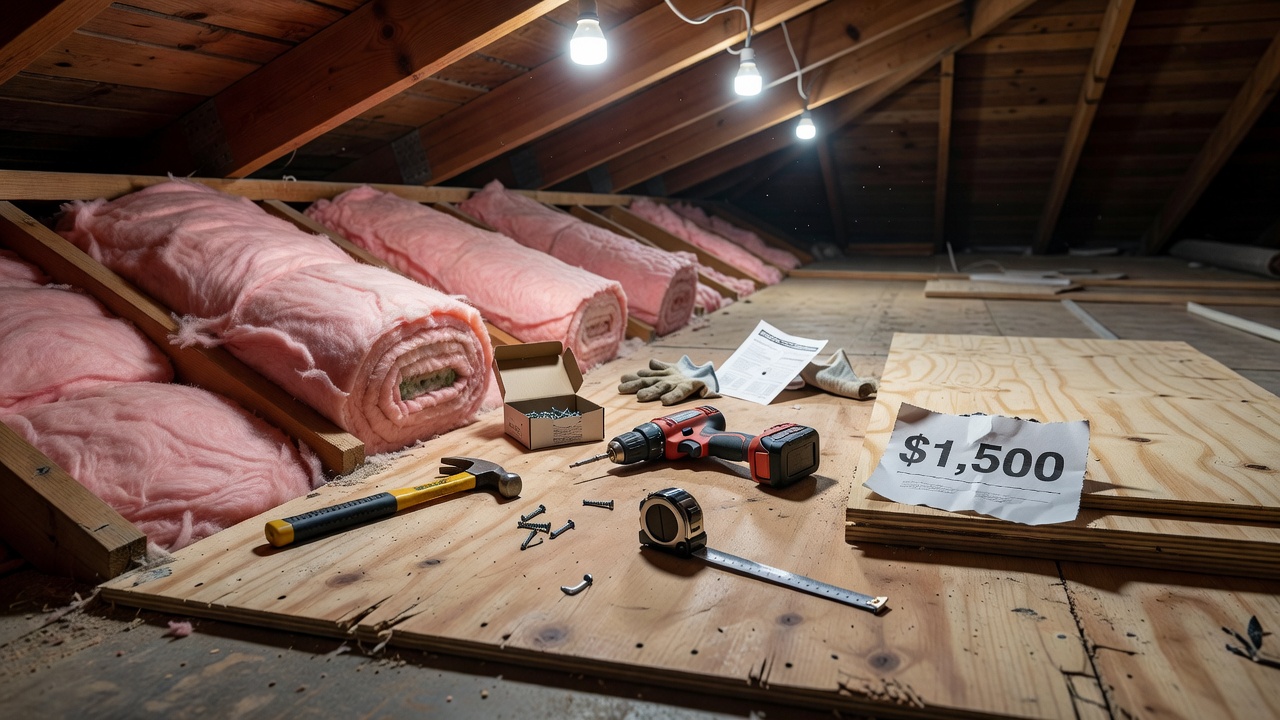
Homeowners tackling fixer-uppers frequently discover that attics represent one of the most overlooked opportunities for affordable, high-impact renovations. In 2026, converting unused attic space into practical storage areas or compact living zones can dramatically increase a home's functionality and resale value. This comprehensive guide delivers beginner-friendly, step-by-step advice tailored for those working within tight budgets. We focus on essential upgrades including insulation, flooring, and lighting that can be completed for under $1,500 as of 2026-06-25. Throughout the article, you will find detailed material comparisons, space optimization strategies, real-world before-and-after examples, a numbered action plan, cost breakdowns, safety tips, and a robust FAQ section. The emphasis remains on maximizing home improvement value while steering clear of topics already covered in other room-specific renovation guides.
Why Attic Reno Makes Sense for Fixer-Uppers
Many older homes feature attics plagued by inadequate insulation, uneven or nonexistent flooring, and insufficient lighting. These conditions turn potential living or storage space into dusty, unusable voids. A targeted budget renovation addresses these issues directly. Improved insulation reduces energy loss through the roof, leading to lower heating and cooling bills over time. Adding stable flooring creates safe walking surfaces that allow homeowners to store seasonal items, holiday decorations, or even create a quiet reading nook or home office corner. The result is increased usable square footage without the expense of a full home addition. For fixer-upper owners, such projects offer quick wins that enhance daily living while building long-term equity. Before beginning any work, evaluate the attic's structural condition, check for roof leaks, and confirm adequate ventilation to prevent future moisture problems.
Material Comparisons for Budget-Friendly Attic Reno
Selecting appropriate materials is critical for staying within budget while achieving durable results. Insulation choices include fiberglass batts, which are easy for beginners to install between joists and offer good thermal resistance, versus blown-in cellulose that fills irregular spaces more completely but may require professional equipment rental. Both options improve energy efficiency when chosen with the correct R-value for your climate zone. Flooring decisions often come down to plywood sheets versus oriented strand board (OSB); plywood provides superior strength and moisture resistance at a modest premium, making it ideal for areas that will see occasional foot traffic. For lighting, LED strip lights and recessed fixtures outperform incandescent bulbs in energy savings and longevity. LED options also generate less heat, an important consideration in enclosed attic spaces. Compare prices at local home improvement stores and read recent product reviews to identify the best value. Always verify that chosen materials meet local fire and building codes before purchase.
Numbered Action Plan for Your Attic Upgrade
Following a clear sequence prevents costly mistakes and ensures professional-looking results. Begin by thoroughly assessing the space: measure floor dimensions, note ceiling heights at multiple points, inspect for water stains or pest evidence, and test floor joist strength by walking carefully across the area. Next, install insulation by cutting batts to fit snugly between joists without compression, or hire a blower for loose-fill material if preferred. Once insulation is complete, add flooring by laying plywood sheets perpendicular to the joists and securing them with screws spaced every 6 to 8 inches. Upgrade lighting by adding both natural sources through existing windows or new skylights if budget allows, and install efficient LED fixtures wired to a convenient switch. Optimize storage with wall-mounted shelving units, under-eave drawers, and stackable bins labeled by season. Finally, finish the space with a fresh coat of light-colored paint on walls and ceilings to brighten the area, plus simple area rugs or seating for living use. Each step builds on the previous one, creating a cohesive transformation.
Cost Breakdowns and Budget Tips
Realistic budgeting keeps projects on track. Insulation materials typically represent the largest single expense, followed by plywood and basic lighting kits. Homeowners can reduce costs by purchasing during seasonal sales, choosing mid-grade materials rather than premium brands, and handling all labor themselves. Track every receipt in a dedicated notebook or spreadsheet. Consider borrowing specialized tools such as staple guns or circular saws from neighbors or local libraries instead of buying them outright. These strategies help maintain the under $1,500 total target as of 2026-06-25 while still delivering quality results. Avoid impulse purchases of decorative items until the functional upgrades are finished.
Space Optimization Tips
Attics often feature sloped ceilings and limited headroom, requiring creative solutions. Install low-profile shelving along the shortest walls where standing is impossible. Use clear plastic bins for visibility and label them clearly. Multi-functional furniture such as ottomans with hidden storage or fold-down desks can turn a small area into a dual-purpose zone. Vertical space above doorways or along knee walls can accommodate shallow cabinets. Measure twice before cutting any materials to ensure every inch contributes to usability rather than wasted space.
Real-World Before-and-After Remodel Examples
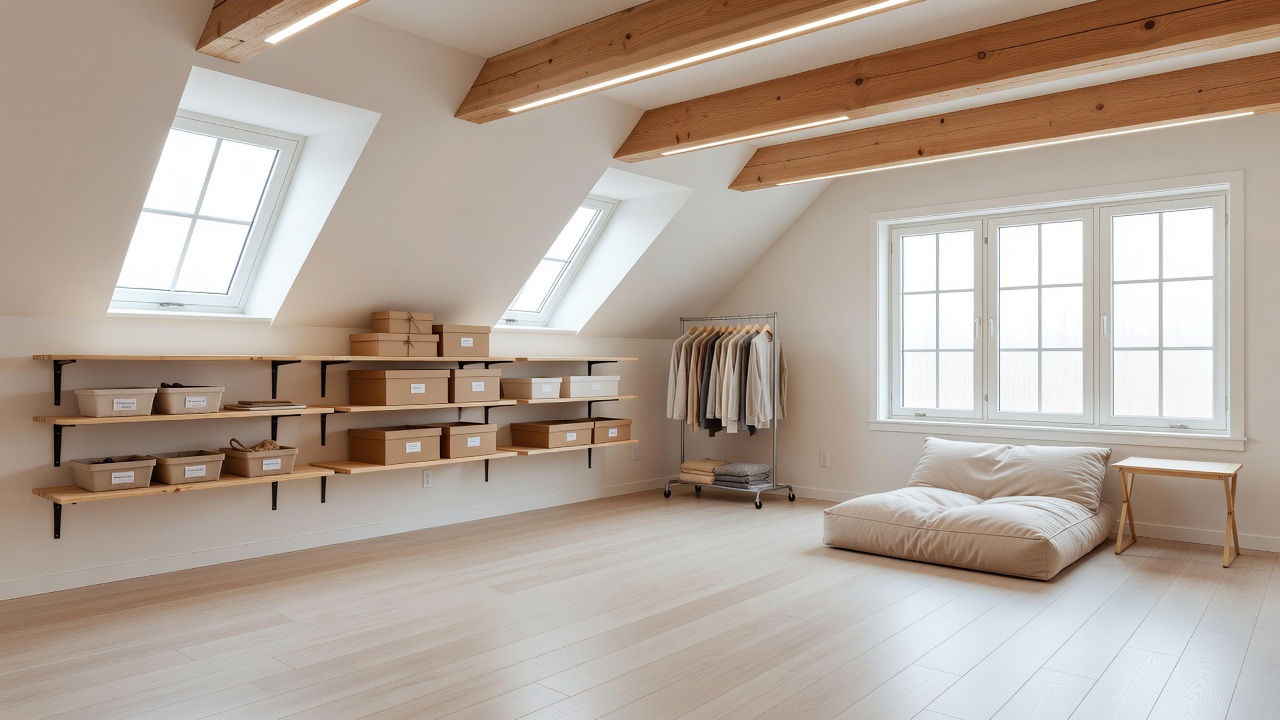
Consider a 1920s bungalow whose attic was transformed from a cluttered storage pit into a functional reading retreat. Before the project, exposed insulation and uneven boards made the space unusable. After adding R-30 insulation, plywood flooring, and three LED fixtures, the homeowner created a carpeted nook with built-in bookshelves that now serves as a daily escape. Another example involves a 1950s ranch home where the attic became dedicated seasonal storage. Pre-renovation photos showed items piled on bare joists; post-renovation, organized shelving and labeled bins allowed easy access while protecting belongings from dust and temperature swings. These cases demonstrate how modest investments yield outsized improvements in livability and organization.
Safety Considerations and Common Mistakes to Avoid
Safety must remain paramount throughout any attic project. Always wear protective gear including gloves, eye protection, and a dust mask when handling insulation. Never step between joists without temporary plywood walkways, as ceilings below can collapse under weight. Common errors include neglecting to add vapor barriers in humid climates, which leads to condensation and mold, or overloading new flooring with heavy boxes without reinforcing joists. Skipping proper ventilation can trap heat and moisture. Taking time to plan electrical runs carefully prevents fire hazards. Learning from these pitfalls ensures a safer, longer-lasting renovation.
FAQ Section
How long does a basic attic reno take?
With good preparation, most DIY projects can be completed over one or two weekends, though larger spaces or unexpected issues may extend the timeline to a full week.
Do I need permits for attic upgrades?
Many areas require permits for electrical work or structural changes. Contact your local building department early to confirm requirements and avoid fines.
What if my attic has low ceilings?
Focus on storage-oriented designs rather than full living conversions. Low-profile solutions and creative vertical storage still deliver excellent results.
How do I handle existing HVAC ducts in the attic?
Work around ducts by building raised platforms or rerouting storage around them. Never block airflow or insulate directly against ducts without professional advice.
Can I add windows or skylights on a budget?
Yes, but prioritize existing openings first. Tubular skylights or small roof windows can be installed affordably if structural conditions allow.
Conclusion
Budget-conscious attic renovations offer fixer-upper homeowners a practical path to increased storage and living space. By following the detailed action plan, comparing materials thoughtfully, and applying the optimization and safety tips provided, you can achieve professional results without exceeding financial limits. Real examples prove that thoughtful planning turns neglected attics into valuable assets. Begin with a thorough assessment of your space, gather the right materials, and enjoy the satisfaction of a completed project that enhances your home for years. For additional authoritative guidance, consult resources from the U.S. Department of Energy on insulation best practices and the EPA for indoor air quality and home efficiency standards.

No comments yet. Be the first!