 Fixated on Home
Introduction: Affordable Dining Room Transformations for Fixer-Uppers
Fixer-upper homes frequently feature outdated dining rooms plagued by worn finishes, inefficient layouts, and limited functionality. Homeowners seeking high visual impact on a limited budget can achieve remarkable results through targeted, phased updates rather than full gut renovations. This comprehensive 2026 guide provides beginner-friendly strategies that emphasize practical planning, material sourcing creativity, and DIY execution to deliver stylish, usable spaces without compromising quality or safety.
Success hinges on prioritizing changes that offer maximum return, such as refreshed lighting schemes and adaptable storage solutions. Real before-and-after transformations demonstrate how neutral color palettes combined with multifunctional furniture can convert cramped, dark rooms into inviting areas perfect for family meals and entertaining. Throughout the process, focus remains on minimizing waste and disruption while building long-term value in older properties.
Step 1: Assessing Your Space and Setting Priorities
Effective renovations begin with a thorough evaluation of the existing room. Measure all dimensions including ceiling height, window placements, and door swings. Document problem areas like poor traffic flow, insufficient seating capacity, or outdated electrical outlets. Sketch a basic floor plan on paper or a digital app to experiment with layout options before any physical work starts. In fixer-uppers, inspect for hidden issues such as water stains on ceilings, uneven subfloors, or outdated knob-and-tube wiring that may require professional attention first.
Prioritize based on impact and feasibility. Cosmetic upgrades like paint and hardware deliver quick wins, while layout adjustments or built-in storage address deeper functional needs. This assessment prevents mid-project pivots and ensures every dollar spent contributes to the overall vision of a brighter, more efficient dining environment.
Phased Renovation Checklist
Breaking the project into manageable phases reduces overwhelm and allows flexibility for unexpected discoveries common in older homes. The following structured timeline supports steady progress over several weeks.
- Phase 1 (Planning and Sourcing): Finalize measurements, create a mood board, and secure all materials from multiple suppliers to compare options and availability.
- Phase 2 (Preparation and Demolition): Clear the space, protect adjacent rooms with drop cloths, and carefully remove outdated elements such as wallpaper or carpet while checking for asbestos or lead if the home predates 1978.
- Phase 3 (Core Structural and Finish Updates): Address flooring, wall repairs, and electrical improvements before applying new paint or finishes.
- Phase 4 (Lighting and Storage Installation): Mount fixtures and assemble custom storage units once walls and floors are complete.
- Phase 5 (Furniture Placement and Styling): Introduce seating, tables, and decorative accents, then refine with textiles and plants for warmth.
Build in buffer days for material delays or curing times. Homeowners who follow this phased method report smoother workflows and fewer costly errors.
Material Sourcing on a Tight Budget
Smart sourcing forms the foundation of any successful budget renovation. Explore local salvage yards, Habitat for Humanity ReStores, and online classified platforms for reclaimed wood, fixtures, and hardware. Overstock items from big-box retailers often sell at reduced prices, and remnant flooring or fabric can complete small projects efficiently. Repurposing existing pieces, such as sanding an old table or painting mismatched chairs to match, preserves character while cutting expenses dramatically.
Compare alternatives carefully: peel-and-stick wallpaper offers removable pattern without commitment, while high-quality primer and paint provide durable coverage for walls. For flooring, engineered wood planks install over existing surfaces more easily than full hardwood replacement. These decisions balance aesthetics, durability, and ease of DIY application. For safety guidance on materials and products, consult resources from Consumer Product Safety Commission before purchasing.
Space-Saving Layout Hacks
Optimizing the dining room footprint maximizes usability in smaller or awkwardly shaped spaces. Position the main table parallel to the longest wall or window to enhance natural light distribution and maintain clear pathways. Extendable or drop-leaf tables accommodate varying guest numbers without permanently occupying floor area. Wall-mounted or floating consoles serve as buffets while eliminating bulky legs that obstruct movement.
Benches along one side of the table save space compared to individual chairs and can include hidden storage compartments. Round or oval table shapes improve circulation in tight quarters versus sharp rectangular edges. Strategically placed mirrors opposite windows amplify perceived room size and brightness. These layout principles create an open, welcoming atmosphere that feels significantly larger than actual square footage suggests.
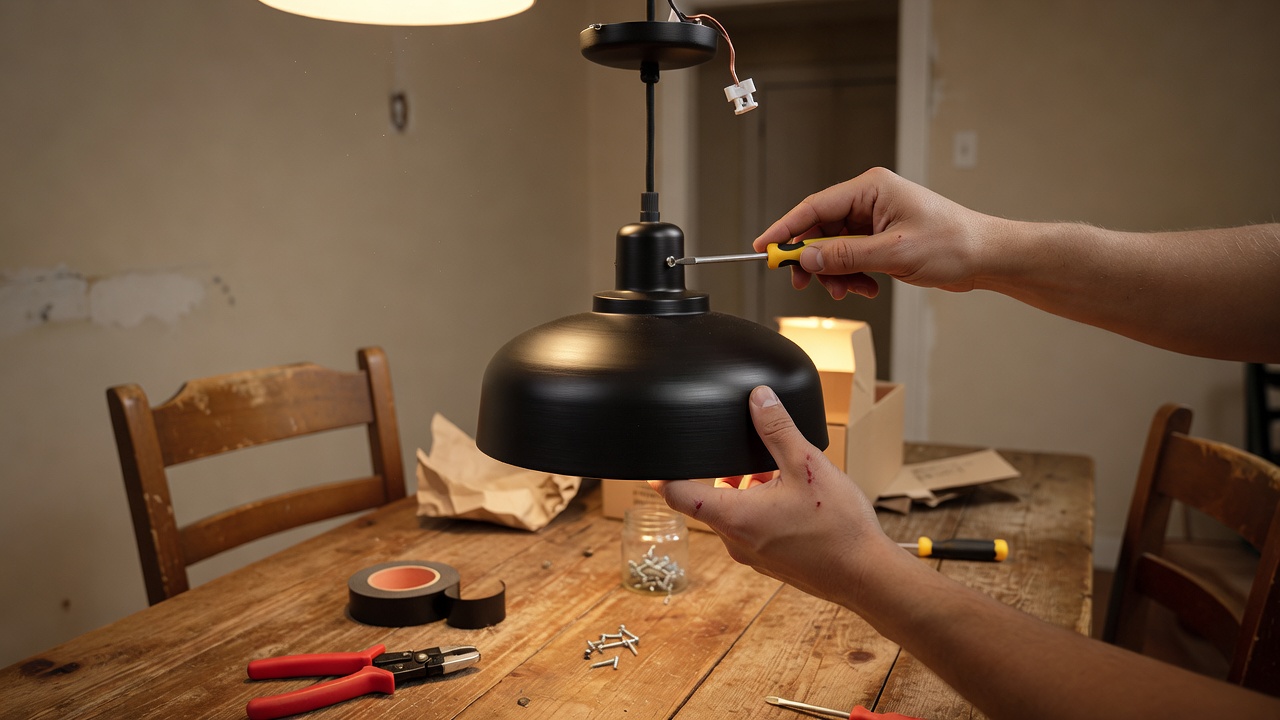
DIY Ideas for Lighting and Storage
Lighting upgrades dramatically alter mood and functionality. Replace outdated chandeliers with affordable modern pendants hung at appropriate heights above the table. Add wall sconces or plug-in picture lights for layered illumination that reduces reliance on a single overhead source. Installing dimmer switches allows easy transitions from bright family dinners to softer evening ambiance. Always turn off power at the breaker and verify wiring conditions before beginning electrical work.
Storage solutions keep the room organized and clutter-free. Construct floating shelves using basic lumber and brackets finished to match wall color for a seamless look. Repurpose vintage crates or baskets into wall-mounted units for linens and serving pieces. Under-bench drawers or slim rolling carts provide additional capacity without visual bulk. These weekend projects require only common tools and deliver immediate practical benefits.
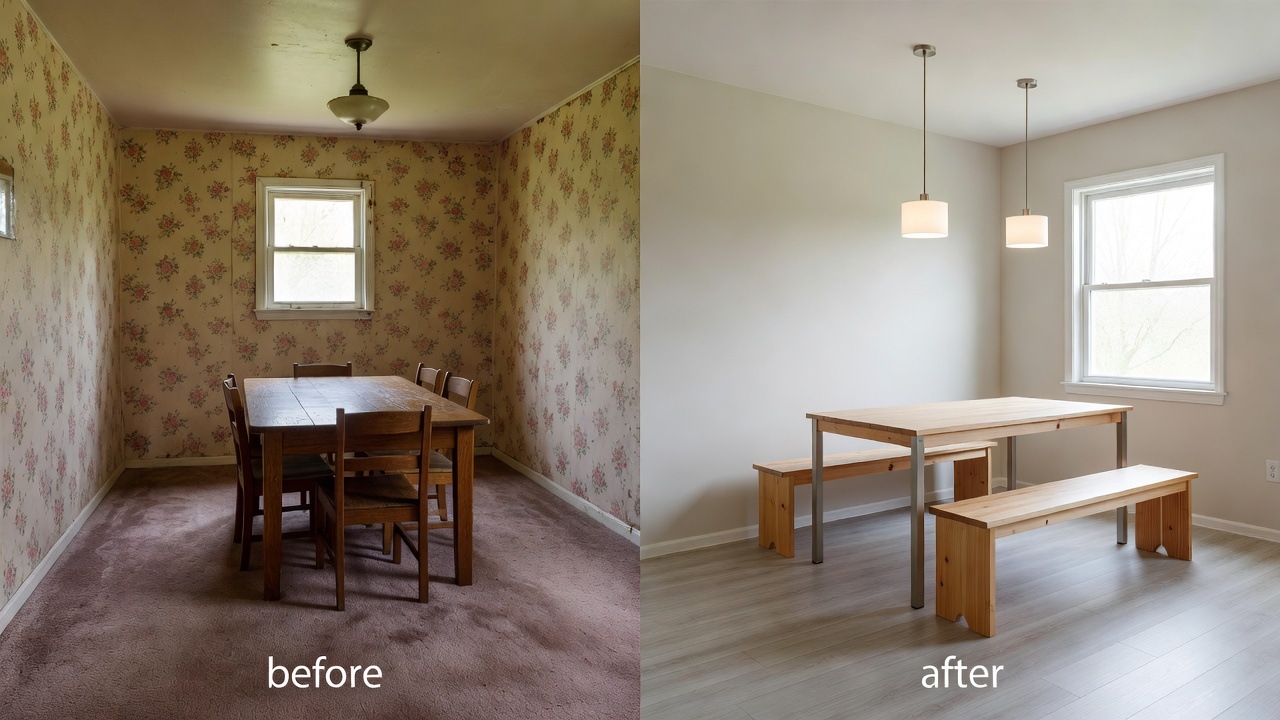
Real Cost Comparisons and Before-and-After Examples
Comparing renovation approaches highlights the advantages of targeted DIY work over comprehensive professional services. Full contractor-led remodels often involve higher overhead, whereas phased owner-executed updates focus spending on visible, high-impact elements such as finishes and fixtures. One documented transformation involved refreshing walls with neutral tones, adding layered lighting, and incorporating modular seating to convert a dark, dated room into an airy entertaining hub. Another example replaced worn carpet with durable laminate and built custom floating storage, resulting in a cohesive, modern aesthetic that enhanced daily usability and perceived home value.
Before-and-after documentation helps track progress and inspires adjustments. Focus on elements that provide outsized visual returns, such as hardware updates or textile layering, rather than attempting every possible change at once.
Common Mistakes to Avoid
- Neglecting proper surface preparation, which leads to peeling paint or uneven finishes.
- Choosing trendy materials without considering long-term durability in high-traffic dining areas.
- Overlooking electrical capacity when adding multiple new fixtures.
- Ignoring scale when selecting furniture, resulting in cramped or disproportionate arrangements.
Testing samples under actual room lighting conditions prevents disappointing color mismatches.
FAQ: Common Pitfalls and Timeline Management
Do I need permits for a dining room refresh?
Most cosmetic updates like painting, flooring overlays, and lighting swaps do not require permits. However, any work involving structural changes, new electrical circuits, or plumbing modifications typically does. Contact your local building department early to confirm requirements and avoid project delays or fines.
How long does a budget reno typically take?
Well-planned phased projects usually span four to eight weeks depending on scope and material lead times. Allow extra days for unexpected issues like repairing subfloors or matching discontinued trim. Consistent daily progress tracking helps maintain momentum.
What mistakes should beginners avoid?
Rushing the planning stage or selecting incompatible materials often necessitates rework. Always verify load-bearing walls before mounting heavy shelves, and use appropriate safety gear during demolition.
How can I manage material costs effectively?
Obtain multiple quotes, shop end-of-season sales, and consider slightly imperfect items that can be repaired or hidden. Prioritizing versatile pieces that serve multiple functions stretches budgets further.
Conclusion
A thoughtful budget dining room renovation transforms fixer-upper spaces into functional, beautiful areas that support daily living and boost property appeal. By following structured assessment, phased execution, creative sourcing, and practical DIY techniques, homeowners achieve professional-looking results while controlling expenses. Begin with small, high-impact steps, maintain organization throughout, and enjoy the rewarding process of creating a space tailored to your needs. Additional energy-efficient lighting guidance is available from U.S. Department of Energy for those seeking further optimizations.

No comments yet. Be the first!