 Fixated on Home

Introduction to Budget Flooring Renovations in Fixer-Uppers
Fixer-upper homes frequently feature outdated, worn, or damaged flooring that requires thoughtful upgrades to improve livability and market appeal. In 2026, homeowners continue to seek affordable solutions that balance cost, durability, and aesthetics without requiring professional crews. This comprehensive guide examines practical material swaps using vinyl plank, laminate, and carpet tiles, providing in-depth comparisons, installation guidance, and real project insights tailored to budget-conscious renovators.
Successful flooring renovations start with assessing the existing conditions of the home, including subfloor integrity, moisture levels, and traffic patterns. These factors influence material selection and help avoid costly mistakes later. Budget renovations emphasize swaps that deliver immediate visual impact while supporting long-term value retention in competitive real estate markets.
Comparing Popular Low-Cost Flooring Materials
Selecting the right material involves weighing performance characteristics against the specific needs of each room. Vinyl plank excels in areas exposed to moisture due to its waterproof core and realistic wood or stone visuals. Laminate offers an attractive wood-grain finish with a robust wear layer suitable for dry living spaces. Carpet tiles provide flexibility for zoned repairs and soft underfoot comfort in family areas.
Vinyl Plank Flooring
This material resists scratches, dents, and stains while requiring minimal maintenance beyond routine sweeping. It installs over most existing subfloors after proper leveling, making it a versatile swap for kitchens, entryways, and bathrooms in fixer-uppers.
Laminate Flooring
Laminate features a click-lock system that enables floating installations without nails or glue. It performs well against fading and everyday wear but should be avoided in high-moisture zones unless paired with advanced underlayment systems.
Carpet Tiles
Modular carpet tiles allow targeted replacement of stained or damaged sections without disturbing the entire floor. They often incorporate stain-resistant fibers and can be arranged in creative patterns to refresh basements or playrooms.
Real-world applications demonstrate how these options transform tired interiors into modern, functional spaces that appeal to a wide range of buyers.
Step-by-Step Installation Tutorials for Beginners
Preparation forms the foundation of any successful project. Begin by clearing furniture, removing baseboards, and inspecting the subfloor for cracks or uneven spots. Repair imperfections with patching compound and allow full drying time. Gather essential tools including a utility knife, measuring tape, rubber mallet, spacers, and a tapping block.
For vinyl plank, acclimate the material in the room for 24 to 48 hours. Roll out underlayment if required, then start laying planks from the longest wall, maintaining consistent expansion gaps. Snap planks together firmly and trim the final row to fit.
Laminate installation follows a similar floating method. Acclimate the boards first, then lay vapor barrier underlayment. Click boards into place row by row, staggering seams for stability. Use a pull bar for the final row and secure transitions with appropriate moldings.
Carpet tiles require a clean, dry subfloor. Apply adhesive dots at corners or follow manufacturer grid lines. Press tiles firmly into position, aligning patterns carefully. Cut border tiles with a sharp blade for precise fits around obstacles.
- Always check manufacturer guidelines for acclimation and expansion requirements.
- Work in small sections to maintain alignment and avoid mistakes.
- Finish by reinstalling baseboards and applying threshold transitions.
These tutorials enable beginners to complete entire rooms over a single weekend with attention to detail.
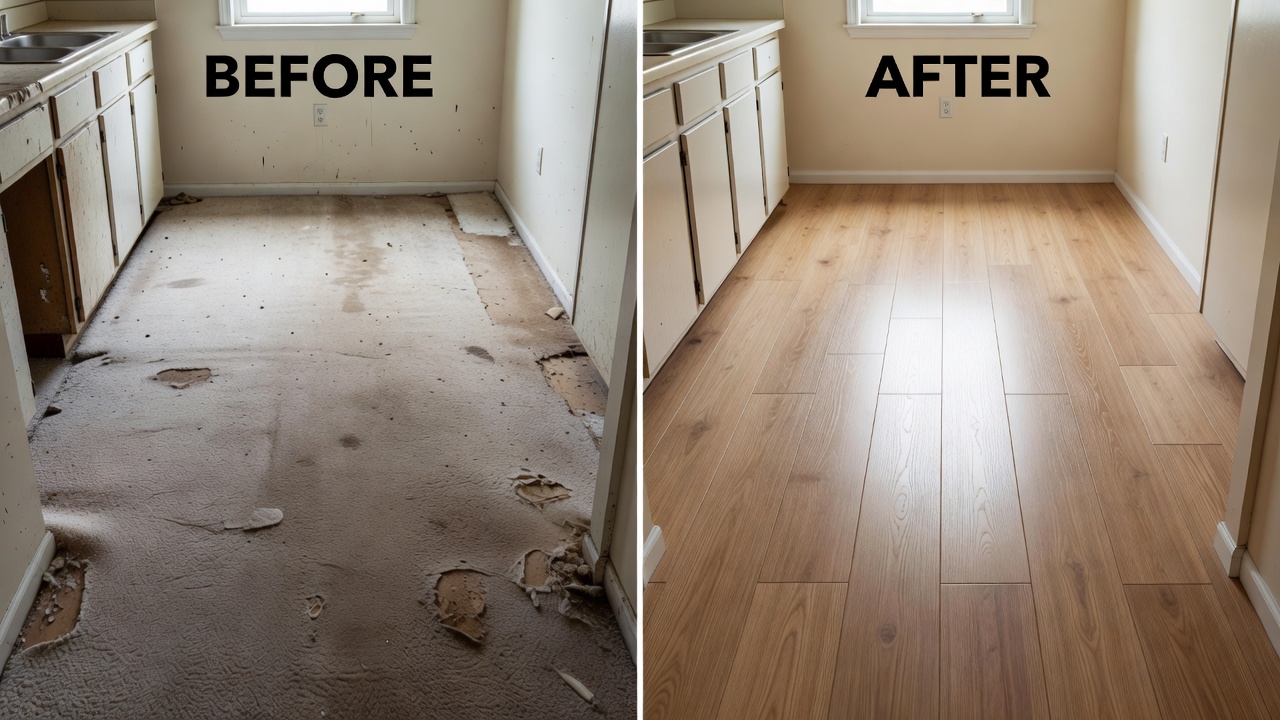
Before-and-After Case Studies from 2026 Projects
A suburban ranch home updated its main living areas by swapping faded vinyl sheet flooring for durable vinyl plank. The change created a seamless, light-reflecting surface that brightened the space and simplified cleaning routines for the family. In a separate urban townhouse renovation, laminate replaced heavily soiled wall-to-wall carpet throughout the upstairs bedrooms, resulting in a fresh, contemporary appearance that enhanced the property's listing photos.
Another project involved refreshing a finished basement playroom using carpet tiles in a high-traffic zone. The modular design allowed quick fixes after spills and play-related wear, preserving the overall investment. These examples illustrate how targeted swaps deliver noticeable improvements while respecting tight renovation budgets.
Common Pitfalls to Avoid
Many renovation setbacks stem from inadequate preparation. Failing to level the subfloor leads to uneven joints and accelerated wear. Neglecting moisture testing in below-grade areas can cause material expansion or mold issues over time. Skipping expansion gaps around walls and fixed objects often results in buckling during seasonal temperature shifts. Always verify compatibility between new materials and existing structures, and consider consulting local building codes for any required permits.
Material Swaps That Boost Home Value
Strategic flooring choices focus on high-visibility areas such as entry foyers, open-concept living rooms, and kitchens. Swapping outdated carpet for resilient laminate introduces a low-maintenance surface that signals modern updates to potential buyers. Vinyl plank installations in moisture-prone zones demonstrate proactive care that reduces future repair concerns. These improvements align with buyer preferences for homes requiring minimal ongoing work.
Maintenance and Durability Considerations
Long-term performance depends on consistent care routines. Vinyl plank benefits from pH-neutral cleaners and avoidance of abrasive pads. Laminate floors stay attractive with gentle sweeping and prompt spill cleanup. Carpet tiles require periodic vacuuming and spot treatment using manufacturer-approved solutions. Regular inspections help identify early signs of wear, allowing timely tile or plank replacements before issues spread.
FAQ Section
How durable is vinyl plank in high-traffic areas?
Vinyl plank maintains its appearance under heavy foot traffic when installed correctly and protected with quality underlayment. It resists everyday scuffs and requires only basic cleaning to retain its finish.
What maintenance does laminate require?
Laminate surfaces need regular dry sweeping and occasional damp mopping with appropriate cleaners. Excess water should be avoided to prevent edge swelling.
Are carpet tiles suitable for allergy sufferers?
Many carpet tile options feature low-emission materials that support better indoor air quality when combined with regular vacuuming and ventilation practices.
Can these materials be installed over existing flooring?
Yes, provided the existing surface is sound, level, and free of moisture problems. Always confirm compatibility with the chosen product's installation instructions.
How do I choose between materials for different rooms?
Evaluate moisture exposure, foot traffic volume, and desired aesthetics. Vinyl plank suits wet zones, laminate fits dry living areas, and carpet tiles work well where flexibility matters most.
For further reading on home improvement techniques, explore guidance from This Old House, Bob Vila, and Family Handyman.
Conclusion
Budget flooring renovations in fixer-uppers deliver meaningful transformations when planned with care. By understanding material options, following detailed installation steps, and avoiding common errors, homeowners can achieve professional-looking results that enhance both daily living and long-term property value.
No comments yet. Be the first!