 Fixated on Home
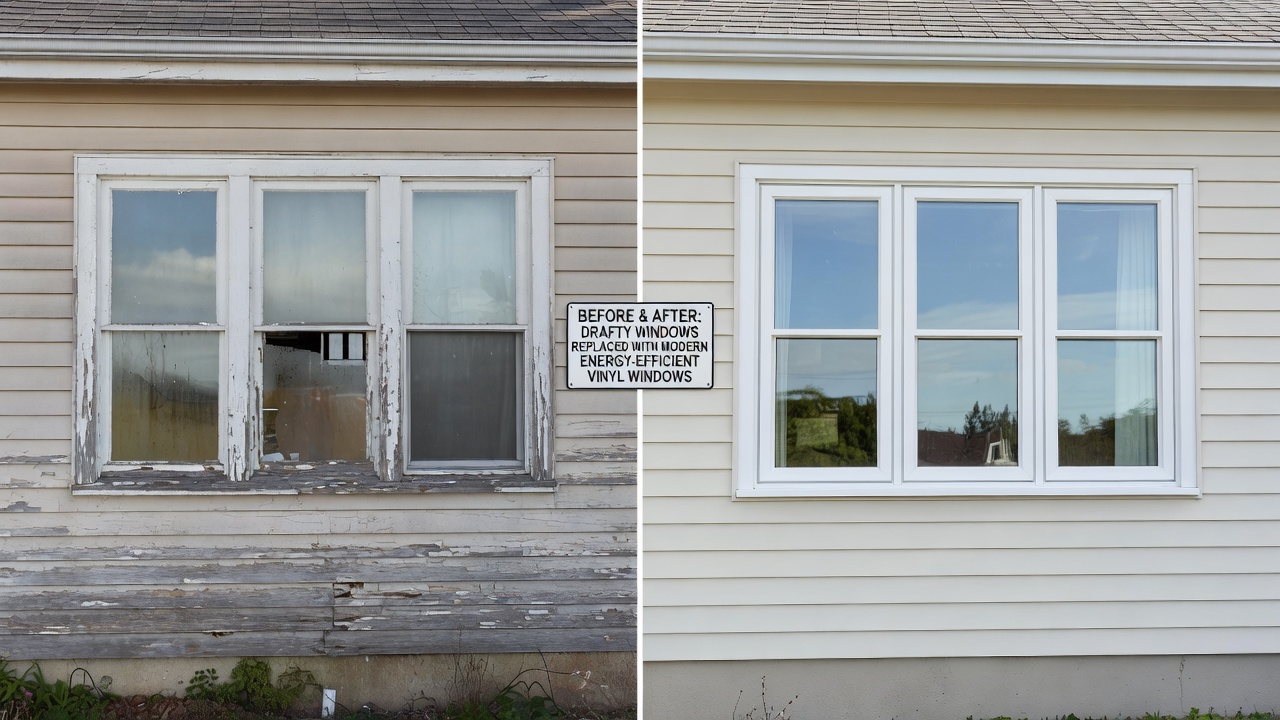
Introduction: Affordable Window Upgrades for Fixer-Uppers
Homeowners tackling fixer-uppers often face the challenge of balancing immediate costs with long-term energy savings. Windows play a critical role in a home's efficiency, and targeted upgrades can reduce heating and cooling demands significantly. This guide focuses on practical, budget-conscious strategies for replacing or improving windows without exceeding typical renovation limits, blending material choices, installation methods, and performance enhancements. Many older properties suffer from inefficient single-pane glass and leaky frames that allow air infiltration, leading to higher utility bills and uncomfortable indoor temperatures year-round. By addressing these issues thoughtfully, you can enhance comfort while adding value to your property.
Whether your property features vintage Craftsman details or mid-century modern lines, the principles remain consistent: prioritize sealing, add insulation where possible, and evaluate DIY versus professional help based on skill level and project scope. Understanding local climate conditions also helps tailor solutions, such as emphasizing solar heat gain control in sunny regions or prioritizing airtightness in colder zones. This comprehensive approach ensures upgrades deliver measurable results over time.
Assessing Your Current Windows for Energy Loss
Begin by evaluating existing windows for drafts, condensation, and frame condition. Use a simple smoke test or infrared thermometer on a cold day to identify problem areas. Older single-pane units or those with deteriorated weatherstripping are prime candidates for upgrades. Document findings room by room to prioritize high-impact zones like south-facing exposures or bedrooms. Pay special attention to caulking around the exterior trim and check for signs of water damage that could indicate deeper structural concerns. Professional energy audits from certified inspectors can provide additional insights if you want a baseline before starting work.
Cost-Effective Material Swaps
Focus on vinyl or fiberglass inserts that fit within existing frames to minimize demolition. These options offer better thermal performance than original wood or aluminum without full replacement. Consider low-E glass coatings for additional solar control. Pair swaps with storm windows for layered protection in harsh climates. Vinyl frames resist moisture and require minimal upkeep, making them suitable for humid environments, while fiberglass provides superior strength for larger openings. When selecting glass, double-pane configurations with argon gas fills improve insulation without adding excessive weight or complexity to the installation process.
Step-by-Step DIY Installation Tips
Measure openings twice and order custom-sized units for a snug fit. Remove old sashes carefully, clean frames, and apply new weatherstripping before inserting replacements. Secure with shims and screws, then test operation. Always work on one window at a time to maintain home security and weather protection. Start by preparing the workspace with drop cloths and safety gear, then gently pry out existing stops and sashes using a putty knife and hammer. Clean all debris from the frame channels and inspect for rot before proceeding. After positioning the new unit, adjust shims to achieve perfect level and plumb, ensuring smooth operation of any moving parts like sashes or casements.
Double-check for gaps around the perimeter and address them immediately with appropriate fillers. This methodical process reduces the risk of errors and allows you to learn as you go, building confidence for subsequent windows in the project.
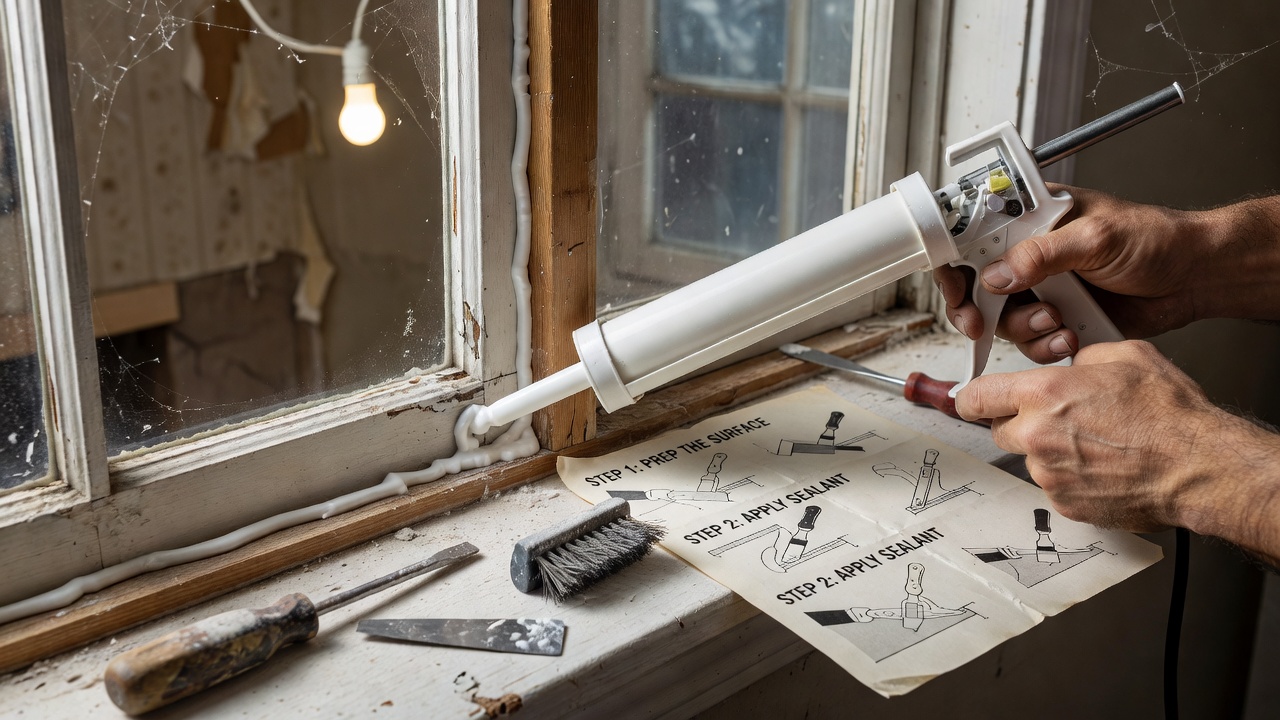
Sealing Techniques for Maximum Efficiency
Apply high-quality caulk around exterior perimeters and use expanding foam for larger gaps behind trim. Interior sealing with rope caulk or adhesive-backed tape provides an extra barrier. Revisit seals seasonally, as temperature fluctuations can cause shrinkage. For best results, choose paintable silicone or polyurethane caulks rated for exterior use, and backer rods can help control foam depth in wide crevices. Proper sealing not only stops drafts but also prevents moisture intrusion that could lead to mold growth over time.
Insulation Add-Ons That Complement Window Work
Install cellular shades or insulated curtains to reduce nighttime heat loss. Add window film kits during winter months for a temporary boost. For deeper improvements, consider exterior storm panels or interior window inserts that create an air pocket for better R-value. These additions work synergistically with new windows by creating multiple layers of resistance to heat transfer. In particularly drafty homes, combining shades with heavy draperies offers an inexpensive way to customize comfort on a room-by-room basis.
DIY Versus Professional Approaches
DIY suits handy homeowners comfortable with basic carpentry and willing to invest time in learning curves. Professional installation ensures warranty coverage and precise fits, especially for complex multi-story projects. Compare timelines, tool requirements, and potential error costs before deciding. DIY allows full control over pacing and material selection, often fostering a deeper understanding of your home's construction. Professionals bring specialized equipment and experience that can accelerate completion, particularly when dealing with tricky architectural details or lead paint in pre-1978 homes. Weighing these factors helps match the approach to your specific situation and available resources.
Real-World Before-and-After Examples with ROI Calculations
One suburban bungalow project replaced six windows using insert kits and sealing upgrades. Post-installation monitoring showed noticeable drops in utility usage over the first heating season. Similar updates in a ranch-style home yielded payback through combined energy reduction and increased property appeal. Homeowners frequently report improved indoor comfort alongside quieter interiors due to better sound insulation from modern units. Tracking energy bills before and after provides concrete data for personal return-on-investment analysis, highlighting how even modest upgrades accumulate meaningful savings across multiple seasons.
Remodeling Tips for Various Home Styles
- Victorian homes: Choose divided-lite inserts to preserve historic character while upgrading performance.
- Ranch styles: Opt for larger picture windows with low-E coatings to maximize natural light.
- Craftsman bungalows: Maintain wood grain finishes on frames for authentic aesthetics.
- Colonial revivals: Select double-hung styles with simulated divided lights to match original proportions.
Common Mistakes to Avoid
Rushing measurements often leads to ill-fitting units that compromise both appearance and efficiency. Skipping surface preparation can prevent proper adhesion of caulks and weatherstripping. Overlooking ventilation during foam application may trap moisture behind walls. Always allow adequate curing time for sealants before exposing windows to rain or extreme temperatures. Reviewing manufacturer guidelines thoroughly before each phase prevents costly rework later in the project.
Tools and Materials Checklist
Essential items include a tape measure, level, caulk gun, utility knife, putty knife, safety glasses, and gloves. Gather weatherstripping, shims, screws, and expanding foam in advance so work proceeds smoothly without interruptions. Having a helper available simplifies handling larger units and ensures safety when working at heights.
FAQ: Common Challenges and Solutions
How do I handle uneven window openings in older homes? Use adjustable shims and flexible caulk to create level, sealed installations.
What maintenance extends the life of new windows? Clean tracks regularly and inspect seals annually for wear.
Can these upgrades work in rental properties? Focus on reversible methods like storm windows and films that require no permanent alterations.
Are there regional considerations for window choices? Yes, select products rated for your climate zone to optimize performance and longevity.
How soon can I expect noticeable comfort improvements? Most homeowners observe reduced drafts within days of completion, with energy bill impacts becoming clear after one full season.
Conclusion
Strategic window improvements deliver measurable comfort and efficiency gains for fixer-uppers. By combining smart material choices, thorough sealing, and informed installation decisions, homeowners achieve lasting value. Start with assessment, proceed methodically, and enjoy the benefits of a more energy-resilient home. For additional guidance on energy-efficient building practices, consult resources from the U.S. Department of Energy and ENERGY STAR program.
No comments yet. Be the first!