 Fixated on Home
Introduction
Transforming a basement in a fixer-upper home does not require a large investment. With strategic planning and affordable materials, homeowners can create functional living space while staying within a modest budget. This guide focuses on practical steps for assessment, waterproofing, material selection, and phased execution to deliver results that look professional. Many DIY enthusiasts successfully turn neglected basements into usable rooms by focusing on essentials like dryness, lighting, and simple finishes. The process emphasizes patience and incremental progress to avoid burnout and maintain quality throughout.
Assessing Your Space
Begin by evaluating the basement layout, ceiling height, and existing utilities. Measure the square footage and identify load-bearing walls or support columns. Note any windows for natural light opportunities and check electrical outlets and plumbing access. A thorough walkthrough reveals potential challenges early and prevents costly surprises during installation. Walk through the area multiple times at different times of day to observe lighting conditions and any signs of settling. Document everything with photos and notes to create a clear plan. Consider how the space will be used, whether for storage, a home office, or a family room, as this influences material choices and layout decisions. Factor in access points like stairs and doors to ensure the final design flows well with the rest of the home.
Moisture-Proofing Techniques
Moisture control is essential before any finishing work. Start with a dehumidifier to reduce humidity levels below 50 percent. Apply waterproof sealant to concrete walls and floors, then install a vapor barrier on below-grade surfaces. Improve drainage by ensuring gutters direct water away from the foundation. These steps create a dry environment suitable for living areas. Inspect for cracks or efflorescence, which indicate ongoing water issues that need addressing first. Use a moisture meter to test walls and floors before proceeding. For official guidance, consult EPA resources on indoor moisture. Adding French drains or sump pumps may be necessary in problem areas, but start with simpler fixes to keep costs low. Proper ventilation through exhaust fans also helps maintain dryness over time.
Selecting Budget-Friendly Materials
Choose durable yet inexpensive options such as vinyl plank flooring, moisture-resistant drywall, and pre-primed trim. Paint in light colors to brighten the space without expensive lighting upgrades. Reclaimed wood or laminate shelving can add character at low cost. Focus on multi-purpose items that serve both function and style. Compare products at local home improvement stores for sales and remnants that fit the project scale. Opt for easy-to-install materials like peel-and-stick tiles or interlocking flooring panels to reduce labor time. Consider secondhand finds from salvage yards for unique accents that enhance the overall aesthetic without high expense.
Phased Installation Steps
Divide the project into manageable phases to maintain momentum and control spending. Phase one covers cleaning, sealing, and basic framing. Remove debris, apply sealants, and build simple stud walls where needed for separation. Phase two includes flooring and wall installation, starting with the subfloor if required and then hanging drywall or paneling. Phase three finishes with trim, paint, and simple furnishings. Working in stages allows testing of each element before proceeding. In each phase, gather all tools and materials in advance to avoid interruptions. For framing, use pressure-treated lumber at the base for added protection. When installing flooring, acclimate materials to the basement environment for several days. Painting should occur last to protect new surfaces, using mildew-resistant formulas for longevity.
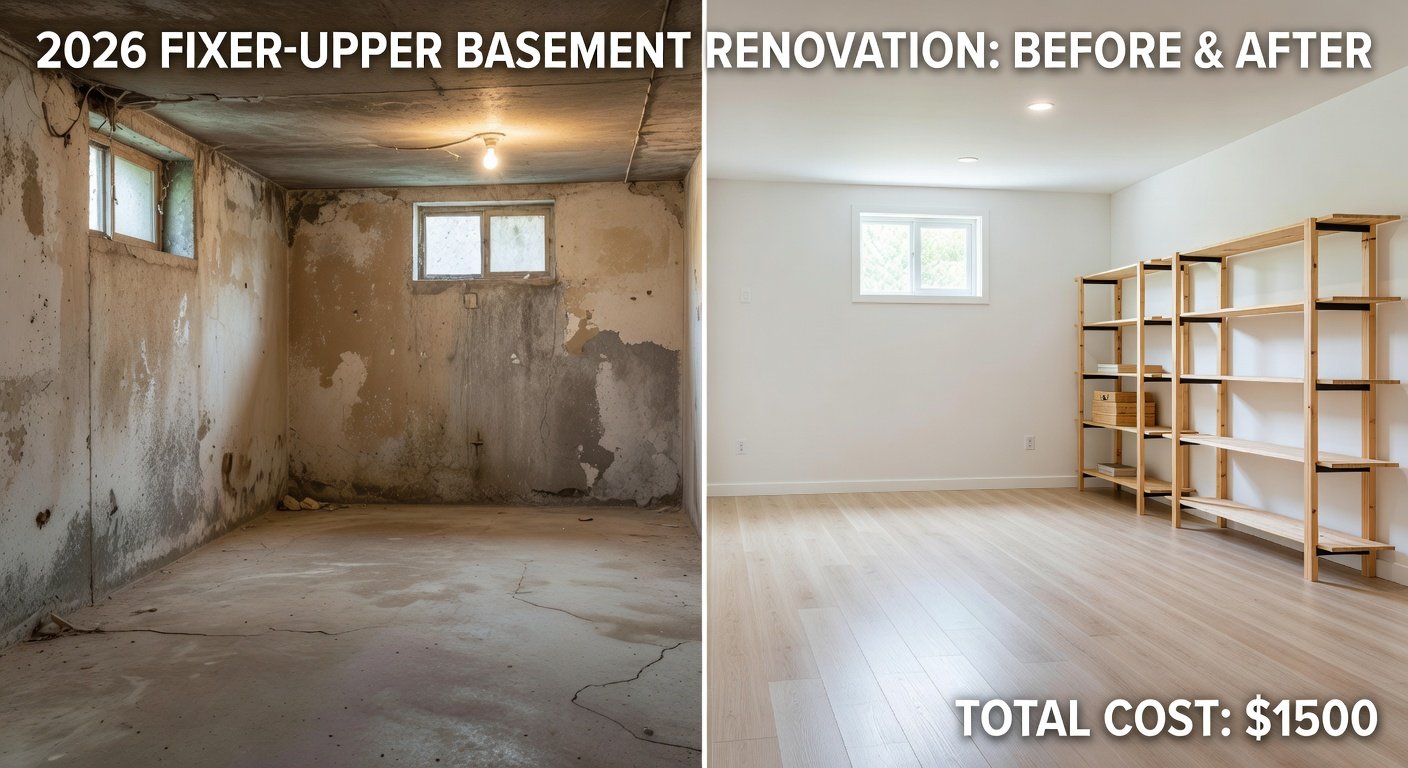
Real-World Before-and-After Examples
One homeowner converted a damp storage area into a guest bedroom by first sealing walls and adding vinyl flooring. The result was a cozy space used year-round with added curtains for privacy and a small desk for versatility. Another project turned an unfinished laundry zone into a home office with modular storage and bright paint, improving daily workflow significantly. Before photos showed cluttered concrete and exposed pipes, while after images revealed organized shelving, soft lighting, and a welcoming atmosphere. These transformations highlight how focusing on dryness and basic finishes can dramatically change usability. A third example involved creating a playroom for children, where foam mats and low-cost rugs provided safe flooring over sealed concrete.
DIY Versus Hiring Help Comparison
DIY approaches save labor costs but require time and basic skills. Homeowners gain satisfaction from completing the work themselves and can adjust designs on the fly. However, mistakes may lead to rework if experience is limited. Hiring professionals speeds completion yet increases total outlay. For simple tasks like painting and flooring, most homeowners succeed independently. Complex electrical or structural work benefits from expert input. Weigh personal experience against project scope before deciding. A hybrid model often works best, where owners handle prep and finishing while outsourcing tricky elements. This balances savings with quality assurance and reduces overall stress.
FAQ
- How long does a budget basement project typically take? Most phased renovations finish in four to eight weekends depending on size and experience level.
- What causes common cost overruns? Unexpected moisture issues or changes in material availability often extend timelines and budgets.
- Can I finish the project in stages over several months? Yes, breaking work into phases prevents fatigue and allows budget adjustments as needed.
- What tools are essential for a beginner? A basic toolkit including a level, drill, measuring tape, and utility knife covers most tasks.
- How do I handle poor lighting in the basement? Layer lighting with overhead fixtures, task lamps, and reflective surfaces to maximize brightness.
Conclusion
A thoughtful approach to basement transformation yields usable space without exceeding financial limits. By prioritizing moisture control, smart material choices, and organized steps, any homeowner can achieve satisfying results in a fixer-upper property. Regular maintenance after completion ensures the space remains comfortable and inviting for years to come.


No comments yet. Be the first!