 Fixated on Home

Introduction to Budget Basement Waterproofing in Fixer-Uppers
Fixer-upper properties often hide moisture issues in basements that can lead to structural damage, mold growth, and reduced home value. In 2026, homeowners are turning to accessible DIY solutions that focus on prevention without expensive contractors. This guide covers practical strategies for moisture control using common materials and techniques suitable for beginners while incorporating advanced methods for lasting results. Older homes frequently lack modern drainage or vapor barriers, making proactive waterproofing essential. By addressing water intrusion early, you protect your investment and create a healthier living space. The emphasis here remains on budget-friendly approaches that deliver professional-grade outcomes through careful planning and execution.
Water damage in basements ranks among the most common concerns for renovators of historic or mid-century properties. Ignoring these problems can compound over time, affecting everything from flooring to electrical systems. A well-executed DIY waterproofing project not only resolves immediate concerns but also positions the home for higher resale value by demonstrating proactive maintenance. Throughout this article we explore material options, tool requirements, detailed installation sequences, and proven safety measures that keep projects manageable for first-time renovators.
Understanding Moisture Problems in Older Basements
Basements in pre-1980s homes commonly suffer from hydrostatic pressure, poor grading, and foundation cracks. Water seeps through porous concrete or masonry, leading to efflorescence, peeling paint, and musty odors. Recognizing these signs early allows targeted interventions before issues escalate. Hydrostatic pressure builds when soil around the foundation becomes saturated, pushing water inward through the smallest openings. Poor exterior grading often directs rainwater directly toward the house, while aging mortar joints in block foundations create additional pathways for intrusion.
Effective waterproofing combines interior and exterior tactics. Interior methods like sealants and membranes offer immediate protection, while exterior grading improvements provide long-term defense. Combining both maximizes results in fixer-uppers where full excavation may not be feasible. Homeowners should also consider seasonal factors such as spring thaws or heavy summer storms that can overwhelm marginal systems. Documenting existing conditions with photographs helps track progress and identify recurring problem areas after each rain event.
Material Comparisons for Cost-Effective Solutions
Several waterproofing products stand out for DIY use. Cementitious coatings provide a rigid barrier ideal for minor leaks, while elastomeric membranes offer flexibility to handle foundation movement. Liquid rubber sealants excel in filling small cracks, and dimpled drainage mats create an air gap to redirect water. Each option carries distinct advantages depending on foundation material and climate conditions. Cementitious products bond well to concrete but may crack if the foundation shifts seasonally. Elastomeric coatings stretch to accommodate minor movement yet require careful surface preparation for proper adhesion.
When selecting options, consider compatibility with your foundation type. Concrete walls benefit from penetrating sealers, whereas block foundations may require parging first. Always test a small area to ensure adhesion before full application. Comparing product longevity, ease of application, and compatibility with future finishing materials helps narrow choices for long-term performance. Many successful projects layer multiple products, such as a penetrating sealer followed by a membrane, to create redundant protection against moisture migration.
Essential Tools and Preparation
Successful projects start with the right equipment. Gather a wire brush for surface cleaning, a masonry chisel for crack repair, a trowel for applying compounds, a paint roller for sealants, and safety gear including gloves, goggles, and a respirator. A shop vacuum helps remove debris quickly. Additional helpful items include a moisture meter to verify dryness before sealing, extension poles for reaching high walls, and mixing buckets for multi-part compounds. Preparation also involves checking for hidden utilities and ensuring adequate lighting with portable work lamps.
Prepare the space by clearing furniture, improving ventilation with fans, and addressing any active leaks with temporary fixes. Check local building codes for permits if excavation or electrical work is involved. Removing stored items prevents contamination and allows full access to all wall surfaces. Establishing a clean, organized workspace reduces errors and speeds up each phase of the project. Homeowners should also inspect gutters, downspouts, and window wells as part of the overall moisture management strategy before beginning interior work.
Step-by-Step Installation Guide
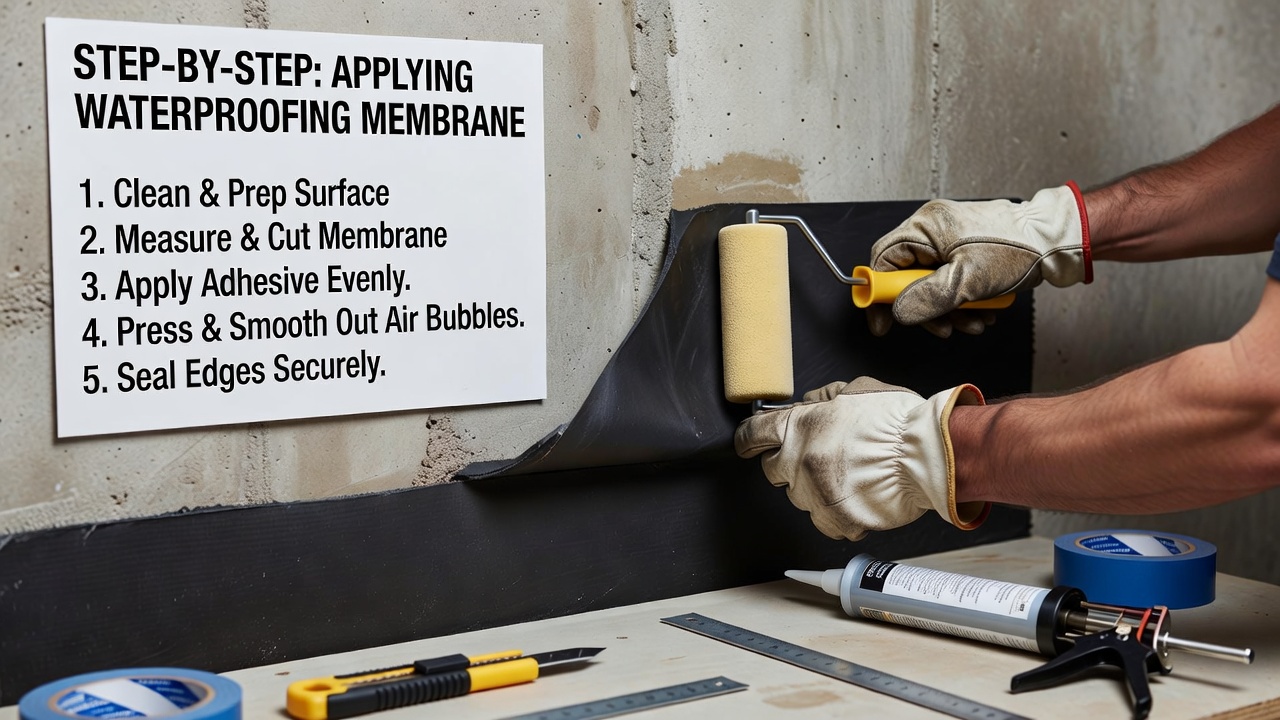
Begin by cleaning walls thoroughly to remove dirt, old paint, and loose material. Repair cracks with hydraulic cement, allowing it to cure fully. Apply a primer if recommended by the product manufacturer, then roll or brush on the primary waterproofing layer in even coats. Working in sections of four to six feet prevents the material from drying before it can be properly finished. Overlap each coat slightly to eliminate gaps that could allow water entry.
For advanced protection, install a dimpled membrane over the sealed surface, securing it with fasteners and overlapping seams. Direct any collected water to a sump pump system if present. Finish with a top coat of paint designed for damp environments to enhance durability and aesthetics. Allow each layer adequate curing time according to manufacturer instructions, typically 24 to 48 hours between coats. Monitoring humidity levels with a simple gauge ensures conditions remain suitable for proper bonding throughout the process.
Safety Protocols for DIY Work
Basement projects involve risks from dust, chemicals, and confined spaces. Work in well-ventilated areas and use appropriate personal protective equipment at all times. Follow guidelines from OSHA for handling hazardous materials and maintaining safe working conditions. Additional best practices include using GFCI-protected outlets for all power tools and keeping a fire extinguisher nearby when working with solvent-based products. Proper ladder placement and secure footing are essential when reaching upper wall sections.
Never work alone in poorly lit or damp areas. Shut off electrical power to the space before starting, and have a first-aid kit nearby. Dispose of waste according to local regulations to avoid environmental harm. Taking scheduled breaks prevents fatigue-related mistakes and allows time to reassess progress. Homeowners with respiratory sensitivities should consider scheduling shorter work sessions or enlisting help for mixing and application phases.
Practical Examples and Before-and-After Scenarios
Consider a 1920s bungalow where efflorescence covered the walls. After cleaning and applying a cementitious coating followed by a membrane, the basement remained dry through seasonal rains. The homeowner reported improved air quality and used the space for storage without concerns. In another case, a 1950s ranch experienced recurring puddles near the furnace. Installing drainage mats combined with exterior soil regrading eliminated standing water and allowed safe relocation of mechanical equipment.
A third example involves a 1940s Cape Cod home with visible mold along the base of the foundation walls. Systematic removal of affected material, followed by application of an antimicrobial primer and waterproof membrane, restored usability. These real-world transformations demonstrate how methodical DIY approaches convert damp, underutilized spaces into dry, functional areas that contribute to overall property value. Photographing each stage provides valuable reference material for future maintenance or when selling the home.
Advanced Techniques for Long-Term Results
Once basic waterproofing is complete, consider adding battery-backup sump pumps or interior French drains for extra security during power outages. Installing dehumidifiers with continuous drainage helps maintain relative humidity below 50 percent, discouraging mold regrowth. For homes with finished basements planned in the future, incorporating vapor barriers behind new framing prevents hidden moisture accumulation. These enhancements build on the primary waterproofing layer without requiring major additional investment.
Common Pitfalls and How to Avoid Them
- Skipping surface preparation often causes sealant failure—always clean and repair first.
- Overlooking exterior grading allows water to pool against foundations; regrade soil to slope away from the house.
- Using incompatible products leads to peeling; verify material suitability for your substrate.
- Ignoring ventilation during application creates health risks; maintain airflow throughout the process.
- Rushing curing times results in weak bonds; follow product-specific drying schedules exactly.
Frequently Asked Questions
What if my basement has active leaks?
Address active leaks with hydraulic cement plugs before applying full waterproofing systems. Persistent issues may require professional assessment of exterior drainage.
How long does DIY waterproofing typically last?
With proper application and maintenance, interior treatments can provide protection for many years, though annual inspections help catch wear early.
Can I finish the basement after waterproofing?
Yes, once surfaces are fully cured and dry, you can add insulation, framing, and finishes. Ensure vapor barriers remain intact during subsequent work.
Should I hire help for any portion of the project?
Many homeowners complete the entire process independently, but enlisting assistance for heavy material handling or high-wall applications can improve safety and speed.
Conclusion
Budget DIY basement waterproofing empowers fixer-upper owners to tackle moisture issues effectively in 2026. By focusing on thorough preparation, quality materials, and safe practices, you achieve durable results that safeguard your property and enhance livability. Start with small sections to build confidence, then expand for complete coverage. Consistent maintenance ensures ongoing protection and value retention. Regular inspections after heavy rainfall provide early warning of any new issues, allowing prompt corrective action before problems spread.
No comments yet. Be the first!