 Fixated on Home
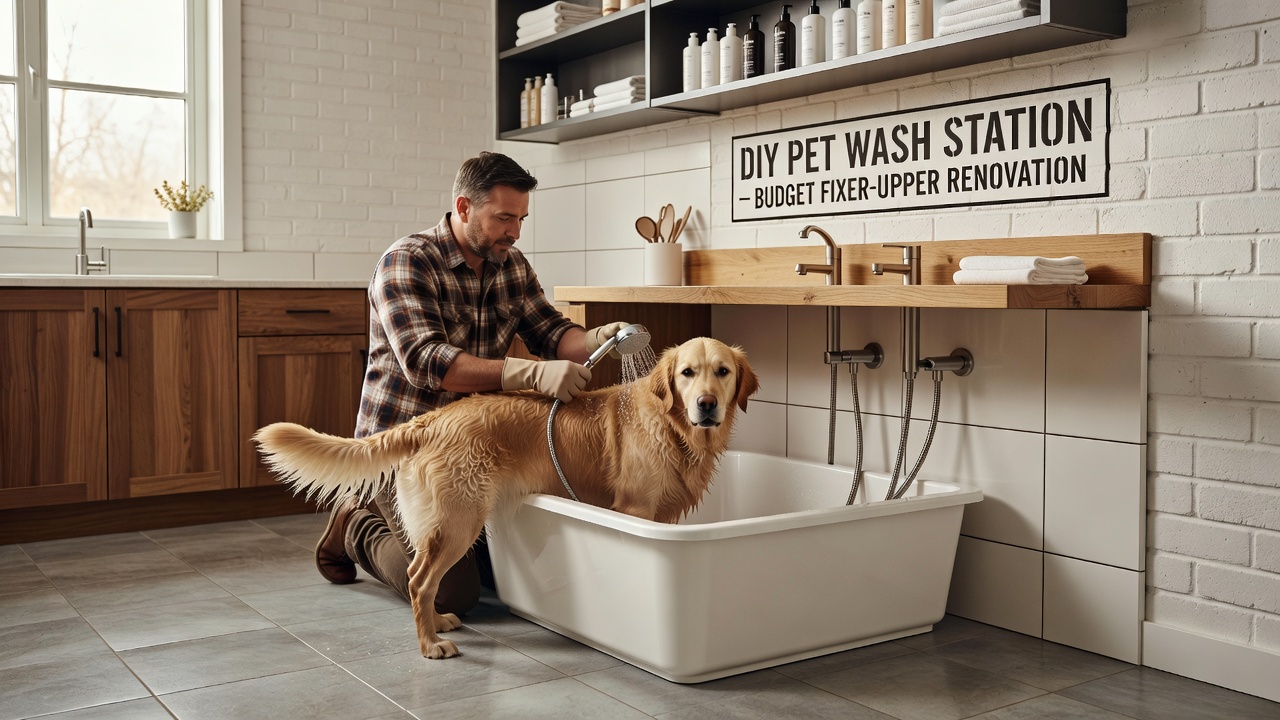
Introduction to Building a Pet Washing Station in Your Fixer-Upper
Homeowners tackling renovations often look for practical upgrades that improve daily life without breaking the bank. A dedicated pet washing station fits perfectly into laundry rooms or mudrooms, offering convenience while adding value to the home. This guide walks through every aspect of creating one using accessible materials and straightforward techniques suitable for most skill levels. Whether you have a small apartment-style laundry closet or a spacious mudroom in a larger fixer-upper, the principles remain the same: focus on functionality, moisture control, and pet comfort. By integrating the station into your renovation timeline, you can address plumbing and flooring upgrades simultaneously, saving time and effort later.
Choosing the right location sets the foundation for success. Laundry areas provide existing plumbing access, while mudrooms offer easy entry from outdoors. Evaluate your space for proximity to water lines and drains before starting. Consider factors like floor slope, electrical outlets for potential heated mats, and storage needs for towels and shampoos. Many successful builds start with a simple sketch of the room layout to visualize traffic patterns around the new station.
Selecting the Ideal Site in Laundry or Mudroom Areas
Assess traffic flow and available square footage first. A corner near the washer and dryer works well for indoor setups. Measure twice to ensure the station fits without obstructing doors or appliances. Consider natural light and ventilation to keep the area fresh after use. In older homes undergoing renovation, check for hidden issues such as uneven subfloors or outdated pipes that might need addressing before installation begins. If your laundry room is on the main floor, prioritize noise reduction by adding insulation around the station walls.
Outdoor options suit homes with patios or garages. Weigh climate factors such as temperature extremes and weather exposure against indoor comfort and year-round usability. For example, in regions with harsh winters, an indoor station prevents the need to hose down pets in freezing conditions, while southern climates might favor a shaded outdoor version to avoid heat buildup.
Indoor Versus Outdoor Installations Compared
Indoor stations benefit from controlled environments and integrated home systems. They reduce tracking mud inside and simplify winter washing. Outdoor versions allow messier activities and larger pets but require weatherproofing and seasonal adjustments. Many fixer-uppers blend both by creating a semi-outdoor zone with a covered entry. This hybrid approach maximizes flexibility for different pet sizes and seasons. Homeowners with multiple dogs often report that indoor stations see daily use for quick rinses, while outdoor ones handle heavy-duty baths during summer months.
When deciding, factor in your pet's size and activity level. Small breeds thrive in compact indoor setups, whereas energetic larger dogs may need the extra space of an outdoor platform with non-slip ramps.
Essential Materials and Tool Recommendations
Gather supplies from major home improvement retailers. Focus on durable, water-resistant options like PVC piping, marine-grade plywood, and epoxy sealants. Tools needed include a circular saw, drill, level, and caulk gun for precise assembly. Additional helpful items include a tile cutter if using ceramic surfaces, a stud finder for secure mounting, and safety gear such as goggles and gloves. Prepare a shopping list organized by category: framing, waterproofing, plumbing, and finishing. Double-check measurements against your chosen location to avoid waste. Many builders find it useful to lay out all materials on the floor before cutting to ensure everything fits the planned dimensions.
Waterproofing Techniques for Long-Term Durability
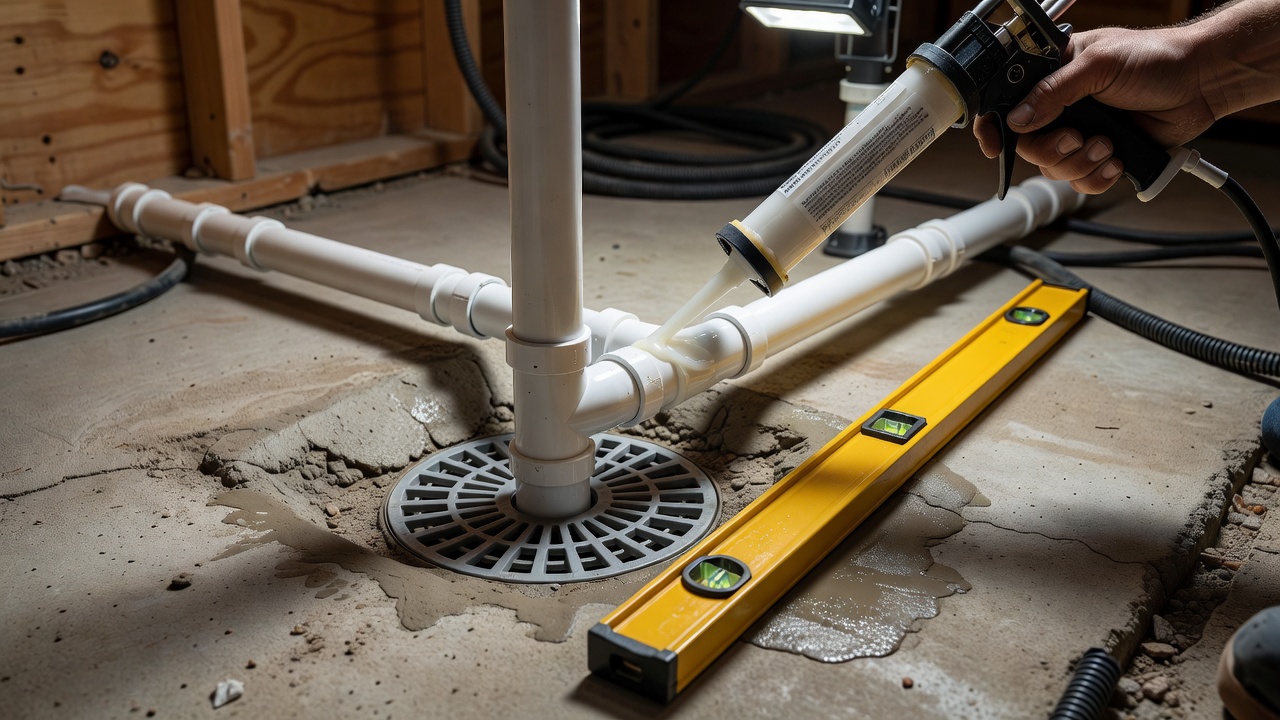
Apply multiple layers of protection starting with a vapor barrier on subfloors. Seal all joints with high-quality caulk and use cement board under tile or vinyl flooring. These steps prevent moisture damage that could affect surrounding structures during renovations. Test waterproofing by running water through the station before final finishes. Address any leaks immediately to maintain integrity. In practice, applying a liquid membrane over seams provides an extra barrier that outperforms basic caulking alone, especially in high-use households with multiple pets.
Common mistakes include skipping the vapor barrier or using standard drywall instead of moisture-resistant alternatives. Always allow full curing time between layers as specified by product instructions.
Plumbing Integration Steps
Connect to existing laundry lines where possible to minimize new installations. Install a floor drain with proper slope for efficient water removal. Use flexible hoses and shutoff valves for easy maintenance and future adjustments. Consult local building codes early in the process to ensure compliance with drainage requirements. For homes without ideal drain access, a small sump pump system can redirect water to a nearby utility sink. Detailed examples show that tying into the washing machine drain line often requires only a simple Y-connector and minimal additional piping.
Professional plumbers recommend testing the entire system under full water pressure before enclosing any walls. This catches issues like slow drainage that could lead to standing water and odors.
Five-Step Assembly Process
- Frame the base and walls using treated lumber for stability. Cut pieces to size and secure with screws rather than nails for better longevity in moist environments.
- Install the waterproof base and flooring materials. Lay cement board first, then apply your chosen surface such as vinyl or tile with appropriate grout sealer.
- Integrate plumbing fixtures and test connections. Attach the faucet or handheld sprayer at a comfortable height for both you and your pet.
- Add walls, storage shelves, and pet-friendly ledges. Include a raised platform for smaller dogs to reduce bending during washes.
- Apply finishes, sealants, and safety features like non-slip surfaces. Install hooks for leashes and towels along with a small cabinet for supplies.
Follow each step methodically and allow curing times between waterproofing layers. Many DIYers document their progress with photos to reference later if adjustments are needed.
Customizable Storage Solutions
Incorporate shelves, hooks, and cabinets sized for pet supplies. Adjustable systems accommodate growing families or multiple pets. Use vertical space efficiently in smaller laundry rooms. For instance, a wall-mounted rack can hold shampoo bottles and brushes while a pull-out drawer beneath the station stores towels. Larger renovations might include a dedicated drying station with a low-heat blower vented to the outside.
Addressing Drainage and Pet Safety Concerns
Ensure drains handle volume without backups by selecting appropriate pipe diameters. Add hair catchers and removable grates for easy cleaning. For safety, choose non-toxic sealants and rounded edges to protect paws. Monitor pets during first uses and adjust water pressure accordingly. Always supervise young or anxious animals and keep electrical outlets safely away from water sources. CDC guidelines emphasize regular cleaning to reduce bacteria risks for both pets and family members. Similarly, EPA recommendations highlight choosing low-VOC sealants for better indoor air quality during renovations.
Maintenance and Scaling for Different Home Sizes
Regular cleaning with pet-safe solutions keeps the station hygienic. Inspect seals quarterly and replace as needed. Larger homes can expand the design with multiple stations or extended counter space. In smaller spaces, modular components allow the station to double as a utility sink when not in use for pets. Seasonal deep cleans involving removing and sanitizing all removable parts prevent buildup that could affect drainage efficiency.
Frequently Asked Questions
How often should the station be cleaned?
Daily rinsing after use combined with weekly deep cleaning maintains hygiene and prevents odors. Monthly inspections of the drain and seals catch minor issues before they escalate.
Can this project be completed in a weekend?
With prepared materials and basic skills, most builders finish the core structure in two days, though plumbing connections may require extra time or professional help for complex homes.
What if my home lacks nearby plumbing?
Consider a portable unit with a pump system or consult a plumber for minimal line extensions that tie into existing laundry infrastructure.
How do I scale the design for very large or small pets?
Adjust platform height and spray nozzle reach based on your pet's measurements. Smaller dogs benefit from raised steps, while large breeds need wider basins and stronger drainage.
Conclusion
A thoughtfully built pet washing station enhances both pet care routines and home functionality. By focusing on careful planning, quality waterproofing, and practical storage, homeowners achieve a lasting upgrade that supports their renovation goals. The result is a customized solution that grows with your household needs over time.
No comments yet. Be the first!