 Fixated on Home
How to Build Budget DIY Window Boxes for Fixer Upper Curb Appeal
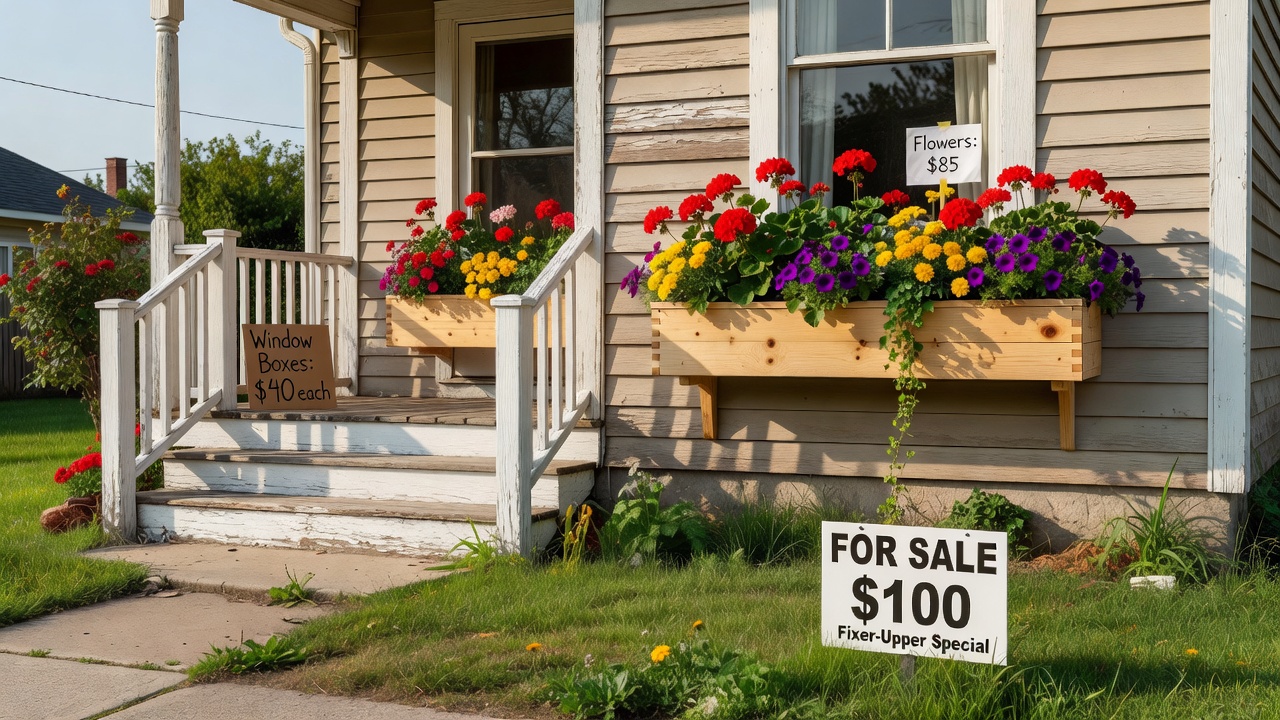
Homeowners tackling fixer uppers often seek simple upgrades that deliver maximum visual impact without draining savings. Building your own window boxes is one of the most effective ways to add charm and value to the exterior. This guide walks through every stage of creating durable, attractive boxes using budget-friendly materials and recycled elements. Whether your home features outdated siding, cracked paint, or simply lacks personality, custom window boxes provide an instant facelift that draws the eye and enhances marketability. They work equally well on single-story ranches, two-story colonials, and everything in between, offering a versatile solution that fits nearly any architectural style while staying well within a modest renovation budget.
Why Window Boxes Transform Curb Appeal
Window boxes instantly soften hard architectural lines and bring seasonal color to any home style. On fixer uppers, they mask uneven siding or dated trim while signaling that the property is cared for. Because they sit at eye level, well-designed boxes create a polished first impression for neighbors and potential buyers alike. Beyond aesthetics, they can improve perceived property value by highlighting windows and creating visual balance. Many real estate professionals note that small exterior details like these often help homes sell faster because they demonstrate pride of ownership. In neighborhoods filled with neglected properties, a few blooming window boxes stand out dramatically and can even inspire community-wide improvements.
Materials Checklist
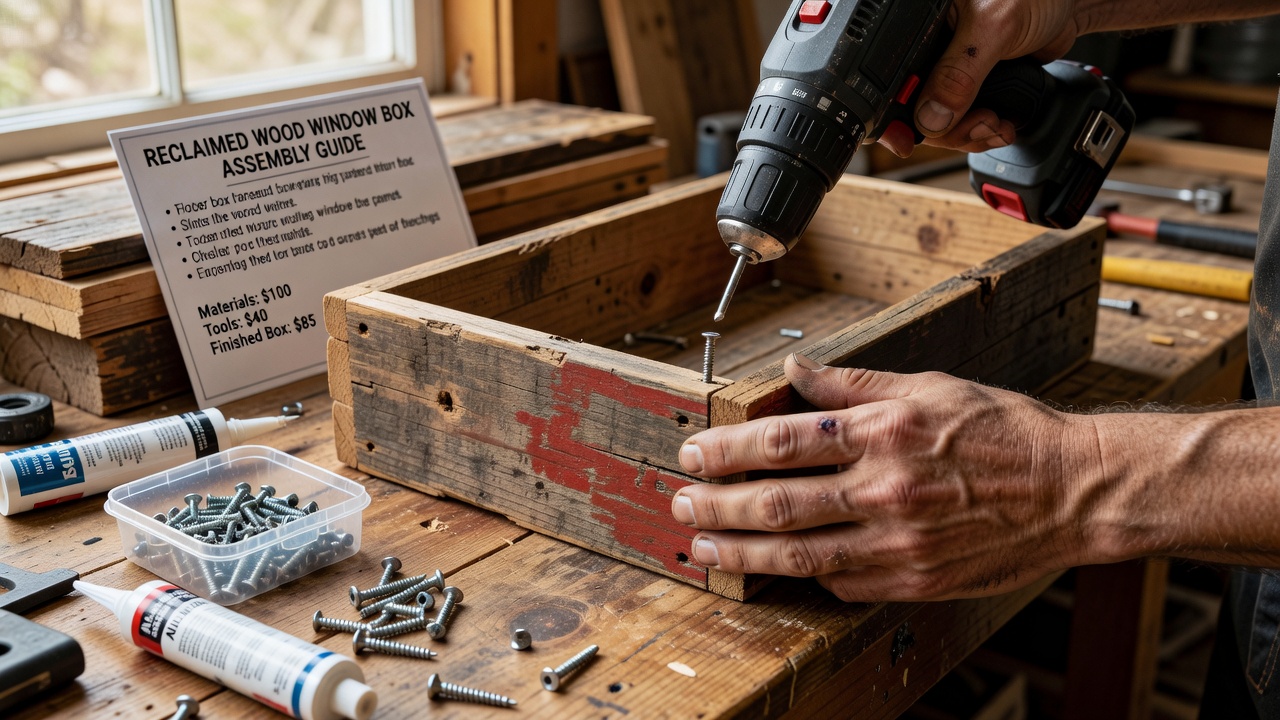
Gather these supplies for a pair of standard 36-inch window boxes. Total material cost stays comfortably under $100 as of 2026-06-19 when sourcing from big-box stores or reclaimed lumber piles. Focus on rot-resistant woods such as cedar or cypress for longevity, and always verify that any reclaimed lumber is free of nails, rot, or chemical treatments that could leach into soil.
- One 8-foot cedar or pine 1x6 board
- Reclaimed pallet wood or fence boards for sides and trim
- Exterior wood screws (1.5-inch and 2.5-inch)
- Wood glue rated for outdoor use
- Waterproofing sealant or boiled linseed oil
- Landscape fabric and drainage holes drill bit
- Basic tools: tape measure, miter saw or handsaw, drill, sander, level
Lowe's and Home Depot stock most items; check the scrap or clearance section first to keep expenses minimal. Consider adding optional items such as metal corner brackets for extra strength or decorative molding if your design calls for it.
Essential Tools and Safety Tips
Before starting, assemble your workspace with proper safety gear including gloves, safety glasses, and ear protection if using power tools. A cordless drill with multiple bits will speed assembly, while a random orbital sander creates smooth finishes quickly. Keep a square handy to ensure corners remain true, and have clamps ready to hold pieces during glue-up. Working on a sturdy workbench or sawhorses prevents back strain and improves accuracy. If you are new to woodworking, practice cuts on scrap pieces first to avoid wasting primary materials.
Step-by-Step Assembly
Follow these instructions to build two matching boxes in a single afternoon. Begin by measuring your windows twice to confirm the final length, allowing a two-inch overhang on each side for visual balance. Cut the base and front/back panels to 36 inches long. Cut two end pieces at 5.5 inches tall by 5.5 inches deep for a classic box profile. Assemble the box shape using glue and screws, predrilling all holes to prevent splitting. Attach a bottom panel with 1/4-inch gaps between boards for drainage. Sand all surfaces smooth and apply two coats of exterior sealant, allowing full drying time between coats. Drill drainage holes every 6 inches along the base and line with landscape fabric. After assembly, test fit each box against its window to ensure the mounting cleat will align properly with wall studs.
Design Variations for Different Home Styles
Colonial homes pair well with simple rectangular boxes featuring crisp white trim. Craftsman bungalows benefit from deeper boxes with exposed corbels or bracket details cut from scrap wood. Victorian properties look charming with scalloped front edges or painted motifs that echo existing gingerbread trim. For mid-century modern homes, sleek lines with minimal ornamentation and a dark stain create a striking contrast. Measure your window width first and scale the box length to leave 2–3 inches of overhang on each side for balanced proportions. You can also incorporate shutters or window box brackets that match existing hardware for a cohesive look across the entire facade.
Wood Versus Composite Options
Traditional cedar offers natural rot resistance and a pleasing grain that accepts paint beautifully. Composite decking boards provide zero-maintenance longevity but require specialized screws and can feel heavier. For budget projects on fixer uppers, reclaimed cedar or pine sealed properly performs nearly as well as new composite at a fraction of the cost. Always choose pressure-treated lumber only for the mounting cleat that attaches to the house, never for the visible box itself. Consider climate: in humid regions cedar outperforms composites because it breathes better, while arid climates allow composites to shine due to UV resistance. Weigh the trade-offs carefully before purchasing.
Weatherproofing with Recycled Elements
Extend box life by incorporating recycled metal flashing along interior seams and using old wine corks as spacers under the base for airflow. Apply two generous coats of exterior-grade polyurethane or a traditional mix of beeswax and linseed oil. Reapply sealant every spring before planting season begins. Another effective technique involves lining the interior with heavy-duty pond liner scraps before adding soil; this creates an extra moisture barrier that protects joints. Elevate finished boxes slightly off the sill using small cedar shims to promote air circulation and reduce trapped moisture against the house.
Plant Selection for Low Maintenance
Choose hardy annuals and perennials suited to your USDA zone. Petunias, geraniums, and calibrachoa deliver nonstop color with weekly deadheading. For foliage interest, mix in trailing ivy or sweet potato vine. Drought-tolerant options such as sedum and lavender reduce watering frequency on busy renovation schedules. Always select plants with similar sun and water requirements for each box. Example combination for full sun: three geraniums in the back, two trailing vincas in front, and a center spike of fountain grass. For shade, try begonias, ferns, and impatiens. Refresh soil annually and fertilize monthly during growing season for best results.
Mounting Your Window Boxes Securely
Secure mounting prevents accidents and extends box lifespan. Locate wall studs using a stud finder, then attach a horizontal 2x4 cleat with lag screws rated for exterior use. Rest the box on the cleat and secure it with additional screws through the back into the cleat. For homes with vinyl or fiber cement siding, add rubber washers to create a watertight seal. Always check local building codes before drilling into exterior walls, especially on multi-story homes.
Common Mistakes to Avoid
- Skipping drainage holes leads to root rot within weeks.
- Using interior-grade wood glue causes joints to fail after the first rain.
- Mounting boxes without a sturdy cleat system creates safety hazards during high winds.
- Overcrowding plants at installation time prevents proper air circulation and growth.
- Ignoring local building codes for window attachments can void insurance coverage.
- Failing to sand edges thoroughly results in splinters and poor paint adhesion.
- Choosing plants mismatched to light conditions leads to disappointing displays and wasted effort.
Maintenance Tips for Long-Lasting Results
Inspect boxes each season for loose screws, peeling sealant, or warped boards. Remove old soil and debris in early spring, then reapply a fresh coat of sealant if needed. Rotate plants occasionally to promote even growth and prune aggressively to maintain shape. In winter, empty boxes completely in freeze-prone areas to prevent cracking from expanding ice. With routine care, well-built wooden boxes can last five to seven years before requiring major repairs.
FAQ
How long does installation take?
Most homeowners complete two boxes and mount them in four to six hours including drying time for sealant.
What budget variations exist for 2026 projects?
Using fully reclaimed materials drops costs below $40. Adding composite trim or custom brackets can raise the total to $85–95 as of 2026-06-19 while still remaining far cheaper than premade boxes.
Can boxes be mounted on vinyl siding?
Yes, but install a horizontal cleat into wall studs behind the siding and use longer lag screws with rubber washers to prevent water intrusion.
Do window boxes require permits?
Usually not for small residential projects, but confirm with your local building department if boxes extend significantly or if you live in a historic district with strict guidelines.
Conclusion
Budget DIY window boxes deliver professional-looking curb appeal on any fixer upper. With careful material choices, proper weatherproofing, and thoughtful plant pairings, these simple additions provide years of enjoyment and increased property value. Start your project this weekend and enjoy the immediate transformation that comes from thoughtful, hands-on improvements.
No comments yet. Be the first!