 Fixated on Home
Introduction to DIY Backyard Cinema for Fixer-Uppers
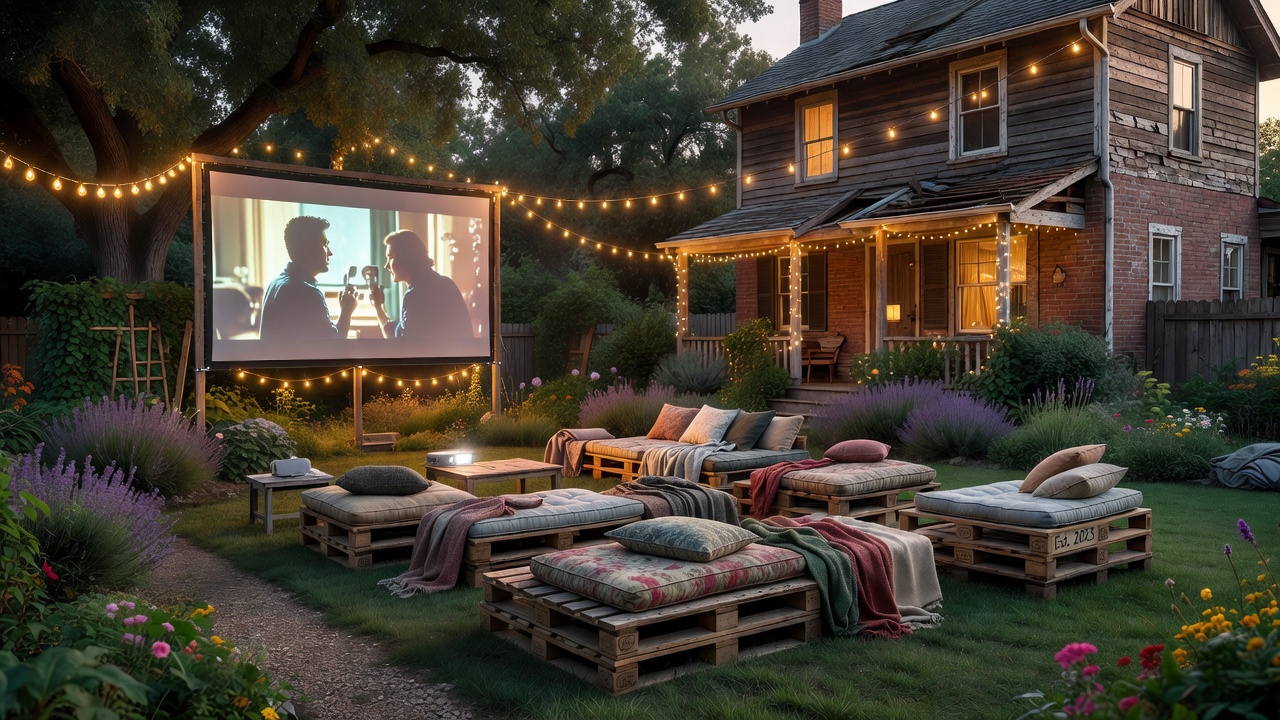
Transforming your outdoor space into a personal cinema adds significant entertainment value to any fixer-upper property. In 2026, homeowners are prioritizing unique, low-cost upgrades that blend functionality with style while addressing common renovation challenges like uneven terrain or outdated landscaping. This comprehensive guide walks through building a durable DIY backyard cinema that enhances your home without requiring expensive contractors. From projector and screen selection to full integration with existing yard features, you will find practical advice, real-world examples, and decision-making frameworks that help maximize enjoyment across seasons.
Choosing the Right Projector and Screen
Projector selection begins with evaluating brightness, resolution, and connectivity options suited for variable outdoor conditions. Models offering at least 3000 lumens perform reliably when twilight or streetlights interfere with image clarity. Higher resolutions such as 1080p or 4K deliver sharper details for movie nights, while short-throw projectors reduce the distance needed between device and screen in smaller yards. Screen choices range from budget-friendly inflatable units that store easily to tensioned fabric systems mounted on custom frames. Compare blackout cloth, which offers excellent contrast at low cost, against commercial-grade materials that resist wrinkles and fading. Homeowners often repurpose old bed sheets treated with reflective paint for quick prototypes before investing in permanent solutions. Consider screen size relative to viewing distance—aim for a diagonal measurement that fills the primary sightline without overwhelming the space.
Wiring, Audio Integration, and Power Solutions
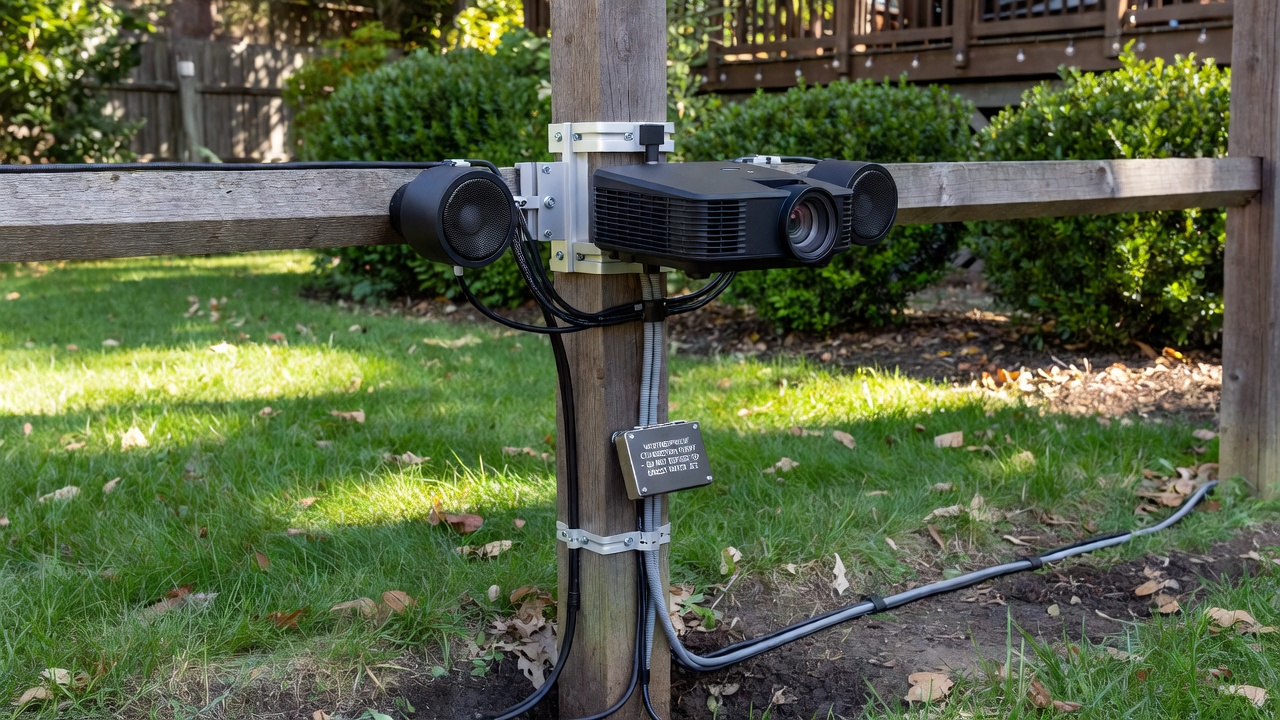
Reliable wiring forms the backbone of any outdoor cinema. Route outdoor-rated cables through buried conduit to protect against moisture and accidental damage from lawn equipment. Position the projector near a stable power source and use weatherproof junction boxes for all connections. Audio integration benefits from pairing weather-resistant Bluetooth speakers with a central receiver that supports multiple inputs. Surround-sound configurations create immersive experiences, while simpler stereo setups suffice for casual viewing. Battery-powered projectors and solar-charged audio units minimize cord clutter and allow flexible placement. Smart plugs enable remote control via smartphone apps, letting you dim lights or start playback without leaving your seat. Test all components together during daylight hours to identify sync issues early.
Weatherproofing Techniques for Longevity
Effective weatherproofing protects electronics and structures from rain, UV exposure, wind, and temperature fluctuations typical in 2026 climates. Apply marine-grade sealants to wooden frames and use UV-stabilized fabrics for screens. Enclose projectors and receivers in ventilated waterproof cases mounted on elevated platforms that keep equipment above ground moisture. Retractable awnings or pop-up canopies provide temporary shelter during unexpected showers. Consult regional climate data from NOAA to anticipate seasonal risks before final placement. Regular inspections of seals and connections prevent costly failures, while quick-dry coatings on metal parts reduce corrosion.
Blending with Existing Yard Layouts
Successful integration respects your current landscaping and architectural features. Map sightlines from seating areas to avoid blocking garden views or pathways. Use existing fences or hedges as natural backdrops for the screen, adding climbing vines for acoustic dampening. Repurpose concrete patios or wooden decks as stable bases for frames and seating. Incorporate native plants around the perimeter to soften hard edges and create privacy without new construction. This approach preserves property value and avoids the disruption of major excavation common in fixer-upper projects.
Step-by-Step Build Instructions
- Measure the intended viewing area and mark boundaries with stakes and string, accounting for screen height and audience sightlines.
- Construct the screen frame using pressure-treated lumber or lightweight aluminum, ensuring square corners and cross-bracing for wind resistance.
- Stretch and secure the projection surface evenly, testing for wrinkles under different lighting conditions.
- Mount the projector on an adjustable stand or ceiling bracket rated for outdoor use, then calibrate focus and keystone settings.
- Install weatherproof wiring runs and connect audio components, verifying volume balance across the space.
- Arrange seating with modular pieces such as pallet sofas or folding chairs, adding cushions for extended comfort.
- Apply final weatherproof finishes and install lighting controls including dimmable path lights and smart bulbs.
Material Comparisons and 2026 Trend Examples
Aluminum frames offer faster assembly and rust resistance compared to traditional wood, though wood provides a warmer aesthetic that blends with garden settings. Tensioned screens outperform loose fabrics in windy areas. Current 2026 trends highlight modular designs that disassemble for storage and sustainable materials like recycled polyester screens. Energy-efficient projectors with automatic brightness adjustment align with eco-conscious renovations; guidance from energy.gov helps evaluate power consumption. Many homeowners now incorporate solar panels to offset electricity use during frequent summer screenings.
Seating and Comfort Options
Beyond basic chairs, consider tiered seating using hay bales covered in weatherproof fabric or built-in bench seating along retaining walls. Add throw blankets and portable heaters for cooler evenings. Families with children often include beanbag zones that can be quickly rearranged for different group sizes.
Lighting and Ambiance Enhancements
Layered lighting creates the perfect atmosphere. Install string lights overhead for a festive touch while using motion-sensor pathway lights for safety. Smart color-changing bulbs allow you to shift from warm pre-show ambiance to full darkness during films. Position fixtures to minimize screen glare.
Maintenance and Upkeep
Establish a seasonal routine that includes cleaning screens with mild soap, checking cable integrity, and storing removable electronics indoors during winter. Lubricate moving parts on frames and inspect seals after storms. These habits extend equipment life significantly.
Budget Breakdown and Cost-Saving Tips
Prioritize versatile, reusable components sourced from local marketplaces or salvage yards. Focus spending on high-impact items like a quality projector and durable screen while economizing on seating and decor through DIY builds. This strategy keeps projects accessible for typical fixer-upper budgets while delivering lasting entertainment value.
Common Mistakes to Avoid
- Overlooking power source accessibility leading to long extension cord hazards
- Ignoring local permit requirements for semi-permanent structures
- Selecting non-weather-rated components that fail after first season
- Placing the screen too close to trees causing shadows or debris issues
- Neglecting audience sightline testing before final assembly
- Underestimating storage needs for seasonal equipment
Legal and Safety Considerations
Check neighborhood covenants and local building codes before installation. Ensure all electrical work meets safety standards and use GFCI protection for outdoor outlets. Clear pathways reduce trip hazards during evening events.
FAQ
How do I control lighting for optimal viewing?
Use dimmable smart bulbs paired with automated schedules. Add blackout curtains on nearby windows and position low-level pathway lights to guide guests without washing out the screen.
What about seasonal storage?
Design modular frames that break down into manageable sections. Store electronics and fabric screens indoors during harsh weather while covering fixed elements with heavy-duty, UV-resistant tarps secured against wind.
Can this setup work in small yards?
Absolutely. Scale screen size proportionally and explore wall-mounted or fence-attached options to conserve floor space. Vertical gardening around the perimeter maintains an open feel.
How do I handle sound in windy conditions?
Anchor speakers low to the ground or use directional models aimed toward the audience. Add acoustic panels made from outdoor fabric-wrapped insulation to reduce echo and wind interference.
No comments yet. Be the first!