 Fixated on Home
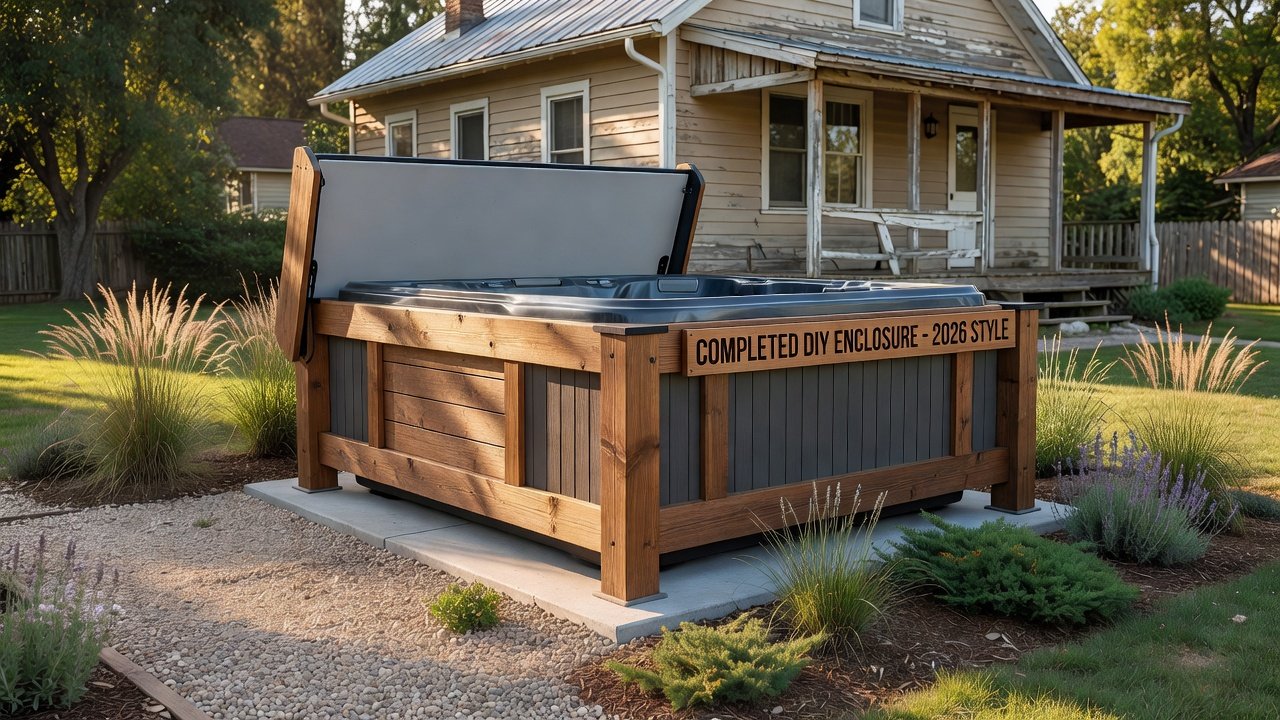
Introduction to DIY Hot Tub Enclosures for Outdoor Renovation
Homeowners tackling fixer-upper properties often seek practical ways to enhance outdoor spaces with a hot tub. This guide focuses on DIY projects that integrate enclosures into existing landscapes while addressing 2026 home improvement trends. Proper planning ensures durability against weather and compliance with local rules. Adding an enclosure not only protects your spa from the elements but also creates a private retreat that boosts property value. Whether your home needs updates to the backyard or a complete outdoor refresh, these beginner-friendly techniques emphasize safety, cost-effectiveness, and integration with current structures. Throughout this article, we explore every phase from initial planning to ongoing care, drawing on real examples to illustrate successful outcomes.
Choosing the Right Site for Your Hot Tub Enclosure
Site selection starts with evaluating sun exposure, drainage, and proximity to the home. Choose a level area away from trees to minimize debris. For outdoor renovation projects, assess how the enclosure will blend with current landscaping features like patios or gardens. Consider wind patterns and privacy needs, as a poorly placed enclosure can lead to uneven heating or exposure issues. Measure the space to ensure at least three feet of clearance around the hot tub for access and maintenance. Soil testing helps identify potential drainage problems early, preventing water pooling that could damage foundations over time. Many successful projects begin with a simple site sketch noting utilities and existing features.
Foundation Requirements and Preparation
A solid foundation prevents settling and structural issues. Begin by clearing the area and installing a gravel base topped with concrete pavers or a poured slab. Ensure the base supports the hot tub weight plus enclosure materials. This step is critical for long-term stability in varying climates. Dig down six to twelve inches depending on your soil type, then compact layers of gravel for stability. Level the surface meticulously using a laser level or straight edge. For regions with freeze-thaw cycles, incorporate a deeper base or frost-proof footings to avoid shifting. Always verify local building codes, as some municipalities mandate specific load-bearing requirements for spa structures. This preparation phase typically takes one to two weekends but saves significant repairs later.
Framing the Enclosure with Weatherproof Materials
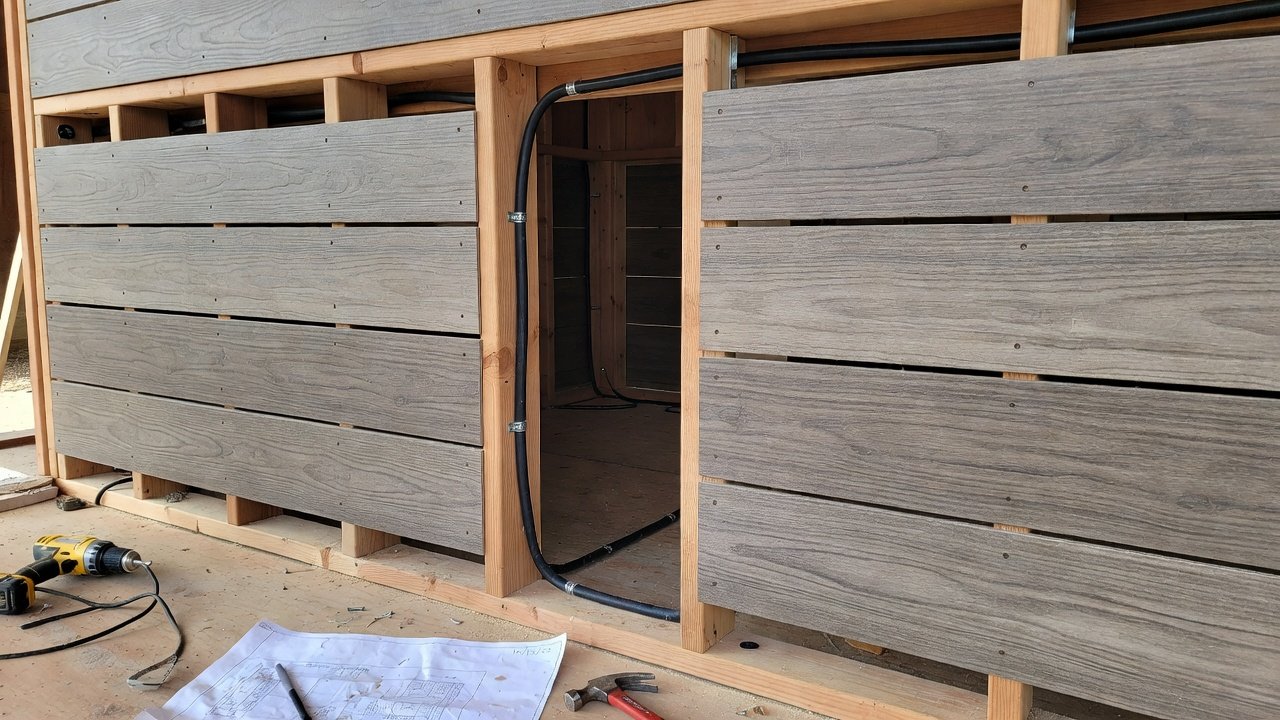
Use pressure-treated lumber for the frame to resist moisture. Compare wood versus composite siding: wood offers a natural look but requires more maintenance, while composites provide better weather resistance and longevity. Secure posts with galvanized hardware and add cross-bracing for wind resistance. When framing, space studs sixteen inches on center for strength, and include a slight roof pitch for water runoff. Beginners should pre-cut all pieces using a miter saw for accuracy before assembly. This approach reduces errors and speeds up the build process.
Step-by-Step Construction Instructions
- Mark the perimeter and dig post holes to code depth.
- Install and level vertical posts using concrete mix.
- Attach horizontal beams and rafters for the roof structure.
- Apply siding panels, leaving gaps for ventilation and expansion.
- Install doors or access panels for easy maintenance access.
- Seal all joints with exterior caulk to prevent leaks.
- Add roofing materials such as corrugated panels designed for outdoor use.
Wood vs Composite Siding Comparison
Wood siding brings warmth and can be stained to match existing decking, making it ideal for rustic fixer-uppers. However, it demands annual sealing to prevent rot in damp climates. Composite options, made from recycled materials, resist fading and insects while requiring minimal upkeep. In coastal areas with salt exposure, composites outperform wood by a wide margin. Budget-conscious builders often mix materials, using wood for visible accents and composites for high-wear areas. Test samples in your yard for a full season before committing to full installation.
Electrical Wiring and Ventilation Safety
Electrical work must follow safety standards. Consult licensed professionals for GFCI-protected circuits. Adequate ventilation prevents mold by incorporating vents in the roof and walls. Reference OSHA guidelines for safe practices during installation. Proper wiring includes dedicated lines from the main panel with weatherproof boxes. Ventilation systems should allow airflow without compromising insulation, especially in enclosed designs. Always shut off power before any modifications and test outlets with a circuit tester. For added safety, install carbon monoxide detectors nearby if using gas heaters.
Integrating with Existing Landscaping
Blend the enclosure by adding native plants around the base. Use trellises for climbing vines to soften the structure. This approach enhances the outdoor renovation without major disruption. Incorporate pathways made from pavers or gravel to connect the enclosure to the house. Lighting fixtures mounted on the frame provide ambiance while maintaining functionality. Consider rainwater collection systems that direct runoff into garden beds for eco-friendly integration.
Real-World Examples from Recent Projects
In a 2025 suburban fixer-upper, one homeowner built a cedar-framed enclosure over a weekend using recycled materials, resulting in a cozy space that doubled as a reading nook. Another project in a colder region added insulation layers to the walls, improving efficiency year-round and allowing winter use. A third example involved a coastal property where composite siding withstood harsh winds, requiring only minor touch-ups after storms. These cases highlight the importance of adapting designs to local conditions and starting small before expanding.
Maintenance Checklists for Longevity
- Inspect siding for damage monthly and repair promptly.
- Clean filters and check water chemistry weekly.
- Seal wood surfaces annually with UV-protectant products.
- Clear snow or debris from the roof in winter months.
- Check electrical connections and vents every quarter.
- Trim surrounding vegetation to maintain airflow.
FAQ on Permits, Insulation, and Climate Challenges
Do I need permits for a DIY hot tub enclosure?
Most areas require permits for structural additions. Check local building departments before starting to avoid fines or removal orders.
How does insulation vary by climate?
In colder regions, add foam board to walls and floors. Warmer climates focus on shade and airflow. Explore energy efficiency resources for tailored advice on materials suited to your zone.
What common mistakes should beginners avoid?
Skipping drainage or using non-weatherproof materials leads to early failure. Always verify load-bearing capacity and consult professionals for electrical tasks.
Are there climate-specific tips for varying regions?
Humid areas benefit from extra ventilation, while arid zones need UV-resistant coatings. Research local weather data to select appropriate materials.
Conclusion
Building a DIY hot tub enclosure transforms fixer-upper outdoor spaces into relaxing retreats. With careful site planning, material choices, and safety focus, these projects deliver lasting value through thoughtful outdoor renovation. Start with small steps, follow local guidelines, and enjoy the process of creating a personalized spa area that enhances your home for years to come.
No comments yet. Be the first!